Pages

Saturday, March 23, 2013

Mini Apple pies

 I love experimenting with food and recipes. Today I decided I wanted to make apple pie, but I didn't want a full pie. I wanted something smaller and with a little more whimsy. I grabbed my cupcake pan, and thought maybe mini pies? Why not?


Roll out your dough, and use a cookie cutter OR (in my case) the lid from my flour jar. It is  4 1/2" in about diameter. That makes for a perfect little circle to fit in the cupcake pan.
 

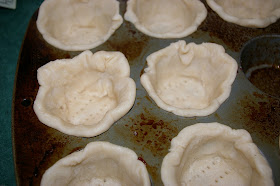
I cut out 7 circles and this was just the right amount so that I still had enough left over for the tops of the mini pies. Then grease your cupcake pan, and lightly push them into each cup, leaving the excess dough around the top so that you can attach the lids.
 
Please forgive my very old and very used cupcake pan... Its not dirty, just old! Its had pam sprayed and baked on to it about a million times. MOMMA NEEDS A NEW PAIR OF PANS PEOPLE!


Next, take a fork and prick the bottoms of the pie shells. This will ensure that they don't puff up during baking, and they will get a nice crispy crust all the way through.


I used a canned apple filling... cheating I know. One jar will fill up 7 mini pies perfectly. I have yet to find a homemade recipe that I absolutely love, so for now I am playing it safe. Semi-homemade is still delish!


Next, roll out the remaining dough. Then take a glass out of your cupboard (mine are about 3 1/4" at the top) and cut 7 tops.
 

Lightly press the edges of the small circles on the top of your pies... PERFECT FIT. Push toward the center with two fingers. It will make filling go toward the center of the pie instead of squishing out the sides.


I love how rustic they look. THEY DO NOT HAVE TO BE PERFECT TO BE BEAUTIFUL!!!
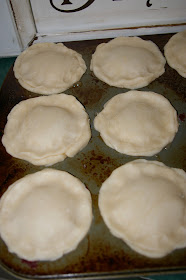


Now you need to take a sharp knife and create a little vent out the top so the steam can release during baking. I also took a fork and pressed a little design around the edges. This will help seal the pies as well. Brush the tops with egg wash (1 beaten egg and a splash of milk or water), and the will be a perfect golden brown when done.

 
Bake them at 375 Degrees for about 35-40 minutes or until they are golden brown on top.
1 tip I would share: after you brush them with egg wash, be careful to watch the vents to make sure the egg wash doesn't bake a "screen" over them and prevent the steam from releasing. As you can see in my picture, a little of the filling came out the sides because my egg wash baked over my vents. You can open the oven after they have been baking 10 minutes or so and re cut the vents, or make sure they are still open.
 These turned out very country rustic, just what I wanted.


The possibilities are endless with the fillings you could do! Cherry, coconut cream, chocolate, or even a chicken pot pie!! Wouldn't the kids love to have their own little one for dinner?
 I think they would also be fun for a ladies lunch, or a bridal or baby shower.
 
 I hope you enjoy this idea! p.s. Do you have a favorite apple pie filling? I would love to try your recipe!
post signature


Saturday, March 9, 2013

Saturday Morning Puffy Oven Pancake and Breakfast Pizza

 
My Hubby could hardly wait long enough for me to snap a pic before he dug into this beauty.


 I experimented with this on Saturday morning because I wanted to make something special for breakfast... and quick. I found the recipe in my Betty Crocker Cookbook.


First, put two tablespoons of butter in a pie dish, and heat your oven to 400 degrees. Let the butter melt inside the dish while the oven heats. When it is melted, pull it out and brush the butter up on all sides.


Lightly beat 2 eggs together in a medium bowl with a wire wisk. Beat in 1/2 cup of ALL PURPOSE FLOUR (do not use bread flour, wheat flour, or self rising flour), 1/2 of milk, 1/4 teaspoon salt and lightly mix all together. DO NOT OVERBEAT or pancake will not puff.
Pour into buttered pie dish and bake for 25-30 minutes.
 
 
When you pull it out, put it on a plate with some lemons and powdered sugar sprinkled on top.
I added some chopped strawberries for color, and it looked and tasted beautiful.


Making this made me feel like a fancy chef, and my family loved it. It is such a special recipe that you could use for Fathers/Mother's day/Birthday breakfast.

Want to hear about my puffy oven pancake FAIL that turned out to be a breakfast pizza?


The first time I made this recipe it worked perfect.... The second time I made it, I tried it with bread flour. Bread flour has a higher content of gluten making for more dense and heavy bread, so the pancake didn't rise as much as it did with the all purpose. The third time (this morning) I made it with whole wheat flour.  The pancake only bubbled as you can see. I was disappointed when I first saw it, but when I cut a slice, it tasted delicious. I decided to turn it into a "Breakfast Pizza" and slice it, instead of tossing it in the trash. A little creativity can go a LONG way, especially when you have kids.
 What kid wouldn't want pizza for breakfast right?
 
I still added the powdered sugar, lemon and strawberries. The lemon juice mixed with the sweetness of the sugar and the butter that baked onto the pancake tastes... well.... HEAVENLY to say the least.


Happy experimenting! 
 
 
post signature


Wednesday, March 6, 2013

A Lovely homemade Valentine for pennies + my favorite play dough recipe

Wont you Be Mine
This Valentines day, I wanted to do something special for family and friends, with out spending... well anything. I dug around in my cupboards and scrapbook box after getting a little "pinspiration".  I thought it would be fun to combine a few of the ideas I found, and this is what I came up with...
 
 
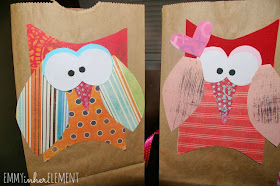
I love paper bags. Especially when you add a little something special to the front. They are sweet and loving and best of all, dirt cheap to make!
I just used scraps from old scrapbook pages that were cut up. No pattern, just cut simple shapes out however you want. I have a vinyl machine so I cut up some little words that say "WHOO LOVES YOU!?"


I had a few little boys to take a treat to and a few little gals. The bag is filled with little zip locks full of heart shaped play dough. Blue for the boys, and pink for the girls. I thought their mothers might appreciate the 'sugar free' gift since they were probably getting loaded up at school.
 
GO HERE for my 5 minute play dough recipe.
 
Next, I needed something for the Adults. Jam and Bread? Sounds great to me. I made some strawberry jam last summer and it is a beautiful red color in the little jar that goes perfect for this Holiday. I took my favorite Betty Crocker Bread recipe (that you see all the time on this site) and instead of making two loaves, I made 3 round smaller loaves.
 
 
Right before sticking them in the oven... I had a little stroke of genius. Why not stamp the top with my heart shaped cookie cutters? WHAT A GREAT THOUGHT.
Here they are getting shoved in with a lovely little stamp. :)
 
 
 And... 25 minutes later! VoilĂ !


 Started with a big pile of scraps... and some good ideas.... Ended with some delicious bread and jam, cute little gift bags, and lots of Love to share.... for almost no $....
That makes one HAPPY mama, and some very happy recipients of little gifts.
Happy Valentines.
 
The very best part of this was delivering the goodies and seeing the smiles on the faces we love!
 
 post signature

Tuesday, March 5, 2013

A FAST envalope pillow cover


DIY pillow cover
 
We all have a few old pillows laying around the house that could use a little makeover and add a pop of color to a room... In my case, it had to be on a budget.
If you're anything like me, you find yourself walking through TJ MAXX or Ross shopping and suddenly you pass the pillow aisle and you see one or two that would look so cute on your bed or in your living room on the couch. I always find one I love, and day dream in the middle of the aisle as to where it would be and how it would look at home... then I check the price tag and I see $20.00 for ONE STINKIN' PILLOW! That's not gonna fly on my budget, SO... I came up with a different solution.
 
Dare I say it? LEARN TO SEW YOUR OWN COVER. :)
I am getting pretty comfy on my sewing machine just stitching little things together like rice bags,  very simple curtains, pillows, or mending things here and there. By no means am I a professional. I figured there were probably enough tutorials on you tube or pinterest that I could learn how to do a quick pillow cover, but once I started playing around with it, I figured out a really simple cover that took no time (and best of all no professional measuring) at all.
I love being able to start and finish a project in an hour or two because I have small children and it is almost impossible to do!
I found some clearance fabric at Hancock Fabric that matched perfect in my kiddos room. I paid 9$ for two yards of the pattern cover, and less than 2$ for the gray backing.
 
 
I did not keep track of the measurements of fabric that I used because I literally eyeballed this project and did not use a measuring tape at all.
 First off, I held up the gray fabric on the brown pillow that I wanted to cover, and made a square just bigger than what would cover. I then cut the piece in half, and folded one side down to hem. If you look at the pic you can see I was so lazy I didn't even cut straight lines. These wont be seen so I didn't bother spending the time making them perfect.
 
 
Next I stitched a hem. It was probably about 1/2 inch but it doesn't matter as long as it keeps the edge down.
 

After hemming the edge, I lined it back up on the fabric about half way down the back side. Your going to have 3 pieces of fabric total. The front cover, and the two halves in the back (that make the envelope)...


  Next, I started sewing around the edges of the pillow to close it all up. Make sure you remember to sew inside out.
 
 
I wanted to put the old pillow in to make sure I sewed it tight enough... you definitely want it tight or it will look homemade and sloppy. See all of that uneven extra fabric on the right side? ITS ALL GOOD. Just trim that off and when you turn it inside out, you wont even know it was there :)
 
 
Now take your second half of the back part, and the trick I found here was to overlap the first half by about 2 inches or more. This way when you are done and put the pillow in, it will cover seam to seam instead of your old pillow trying to bulge out of the opening.

 
Making sure it is inside out, stitch around all of the edges making sure to overlap the second half backing over the first.


Once you have sewn around all of the edges, turn that baby right-side out and shove your old pillow in. As you can see, my corners are a little baggy because I wasn't super picky about getting exact measurements, but I am totally fine with it.
You need some extra fabric to grab when your having a major pillow fight anyway... right?

 
 If you get your pillow in and are able to pull the envelope shut, then good job because you sewed your second backing high enough over the first that the pillow wont bulge and show. The more you get comfortable with this cover, the easier and more accurate your next ones will be.


If you are super impatient and ADD when it comes to reading patterns like me, don't let that be the thing that stops you from trying! It can be done another way! They key is to experiment and not give up!
JUST KEEP SWIMMING JUST KEEP SWIMMING
 

post signature

Monday, March 4, 2013

My little Mustard Desk

 
Last summer while the Mr and I were out running errands on a Saturday morning, we drove by a garage sale in town and I casually glanced out the window as we drove by. I love garage sales, but have found that I have to be careful or I end up with a TON of junk in the basement, just because it was a good deal. Even 50 cents or 3 bucks here and there adds up, so I am learning to be much more selective about my thrifty purchases.
 
So, as we drove by, I noticed a little antique desk amongst all the junk.
I squealed for my husband to turn around and let me have a closer look at it. As soon as I saw that all 4 drawers worked, that it was a true heavy duty solid wood antique desk, that it had amazing character, and adorable features, and was marked as a steal at only 10$... I HAD TO HAVE IT.
 
I quickly gave my hubby "the nod" (the no I cant live without it, come and load it before someone else gets it right now nod) and it was a done deal within 10 minutes.
 
Since I am a busy Mama, she has been waiting patiently in the basement for about 6 months. Every time I walk passed it I dream about how beautiful she will be with her little face lift.
................
 
So about 2 weeks ago I couldn't sleep and I felt like I wanted to start a project. I knew just where to go!
Here is the before picture. (I do have all 4 drawers)


 Here is a picture with the first coat of paint and primer. I wanted to leave as much of the natural distressing as possible. I think it adds so much extra character and makes it an absolutely one of a kind piece.


 I think it is really special when you can see the dark stain of the natural distressing even after you have painted it a new color. The way to get this look is simple to have a very small amount of paint on the brush when you go over these areas, and to do it with a light hand.
 
Sometimes when I start a project like this, I feel like I want to get it done all at once because I don't know when I am going to have time to work on it again after the first coat of paint. If you don't be careful and let the paint have time to dry between layers, It will stay very tacky for a long time and you wont be happy. BE PATIENT. Trust me, I know how hard it is.
 
The next hardest thing is choosing a color. Truth be told, I hadn't decided on one yet for the desk, but I had a few cans of left over paint in the basement, and I thought I should use them before spending money on new. I knew the desk was going in a room upstairs with mustard curtains, so I settled on this yellow. The other cool thing about painting old furniture is, If you hate the color, paint over it. simple as that. The more paint it has, the more shows through during distressing, and the more antique it really looks. WIN WIN.

 
After 2 coats of the yellow, and being very very patient to let it dry, I took it upstairs to her new room. I want to heavily distress it, but I want to give it 2 weeks up sitting upstairs to get really really dry. I am doing this because if the paint is tacky at all when you try to distress, its just going to peel off and you will not get the look you want.
 
One more before...
 
And after... 
Isn't she a beauty? I love am obsessed with the original hardware, and those curvy legs!