Tuesday, November 5, 2013

Cooking, and how it saved me... plus my Roasted and stuffed Acorn Squash!


Since I became a Mother, November tends to be a much harder time of year for me. I always look forward to fall, the changing colors of the trees, the crunch beneath your feet as you take a walk out to the mailbox and the cool crisp scent of the changing air, making you want to rush back inside for a hot cup of apple cider. Then as the weeks go on, the trees become gray and leaves left dead on the ground lose their color. All the world becomes a bit monochromatic to me... and I find myself low on energy, wanting to sleep longer, and having less motivation to get projects done.
After my first child was born in November of 2009, he had really bad colic for about the first 4 months of his life. We would rock and swing and drive and try everything possible to stop the screaming. I realized after many weeks of this routine that things weren't going to change anytime soon, and I shouldn't expect to get much of anything done in the evenings. This made my days extremely short, and nights very very long. At that time my husband worked and was a full time student and although I wanted to beg him to stay up late with me so I would have someone to talk to, I thought it best that at least one of us get some sleep, especially if he was the one providing for our family.
 So there I was, alone, night after night holding a very unhappy baby. I would just get him to sleep and feel like if I moved an inch, he would wake up and scream again. Many nights I tried to sleep with him in my arms, sitting up on the couch.... waking up in a panic thinking he was going to roll off my lap. I found after a little while that he slept better with the soft sound of the TV on in the background. This was more entertaining for me, so it worked in my favor... or so I thought. I found myself wasting my brain away to pointless and silly reality TV shows and poor actresses getting paid to show off their dramatic lifestyle. "you want to see drama? Come to my house and see what I go through every night! Ill give you some drama..." I thought to myself.
 
All the brain draining TV was doing me no good. Finally I found The Food Network channel. I thought at least I would be learning something if I had to stay up late anyway. I started watching Giada De laurentiis, Guy Fieri, Paula Deen, Rachel Ray and The Barefoot Contessa ... Soon I was hooked and I was learning different skills from all of them. I learned that liver is best prepared by pre soaking it in milk, and room temperature ingredients make for a much better baked dessert because the ingredients are more easily incorporated at room temp. I started watching chopped and learned about people who had struggled through drug and crime addictions, depression or loosing a loved one and finding joy and success through cooking. Cooking had pulled them out of a dark place, and helped them become motivated again.
THIS WAS EXACTLY WHAT I NEEDED. I starting doing a little more cooking and experimenting during the day, and trying new recipes (with baby in one arm of course). I even learned to make scrambled eggs while holding the baby, finding a way to crack the eggs, and add them to the pan one handed. I found that it rebuilt my self confidence in a new way. Cooking helped me though my post partum depression and made me feel like myself again. I wanted to have family dinners around the table, and if that was the only thing I could accomplish that day, well then it was ok because I did something great for my family.
I am so thankful for cooking and being able to enjoy spending time in my kitchen. Since all of this started in 2009 there have most certainly been many other trials that cooking has helped me though. It has become a passion and obsession. It makes me happy and brings me and my family so much joy. It helps me feel confident and secure because I know how to be self reliant by cooking and being able to store things away in my freezer for a rainy day.
So, on gray November days like this one when I feel the blues start sneaking back, I find some time to create something... a recipe that brings me happiness and makes me feel like myself again. A reminder that I can get though hard times and create my own happiness.
Todays recipe is another product of experimentation, and frankly cleaning out the fridge and panty. Sometimes I don't have everything I need to make a recipe, so I challenge myself by making up something new. Do they turn out bad? Sometimes yes! And then once in a while I get lucky a recipe will be really good. Here is what I made today from a few fridge, pantry and left over garden ingredients.
 
Roasted and stuffed Acorn Squash
This healthy recipe comes in handy if you are cleaning out your fridge or pantry because you can swap out something I did for something you have at home. The tasty hash stuffing is full of garlic and chicken flavor, with a crunch from the walnuts and a tiny bite of sweet from the craisins.
 
This dish serves 2 adults or can be cut in half or quarters and served to children. The hash can be doubled or tripled for larger quantities.
First, take an acorn squash and slice it down the middle. Gut the seeds and add them to a baking dish. Preheat your oven to 400 degrees. Let them bake about 40 minutes or until fork tested tender.


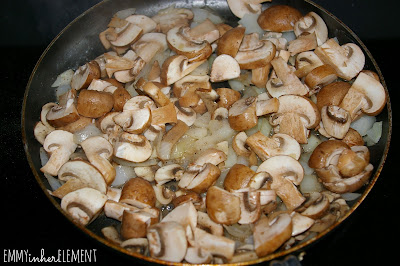
Next, chop half a yellow onion and add in an 8 oz container of mini bella mushrooms (or whatever you have on hand). I chose to use mushrooms as a healthy alternative to meat. These are very hearty mushrooms and they are like mini sponges that soak up all surrounding flavors.
 I also added 1 clove chopped garlic, 1/2 teaspoon salt and 1/4 teaspoon garlic powder and a dash of pepper.
Let them sauté in oil or butter until tender.

 
Prepare 1 box of chicken flavored rice a roni. This will add texture, flavor and creaminess to the stuffing. FOR A GLUTEN FREE OPTION ADD QUINOA PREPARED IN CHICKEN STOCK.


Once the rice is done cooking, remove about 1/3 of it and store it in the fridge for later. Add your mushroom and onion mixture to the rice. Add 1/2 cup of chopped walnuts, 1/2 teaspoon chopped fresh parsley, and a small handful of craisins.


After your  squash is cooked through, remove them from the oven and add the filling. Fill them over the top.
 

I chose to add some of this fabulous cheese I had on hand. It is a cheddar onion cheese that has incredible flavor. I added it on top of my squash, but for more flavor you could add a slice half way through the filling as well.


Then I added them back inside the oven on Vari broil Lo to melt the cheese for a few minutes.
I love the roasted look of the squash but if you want to add them back into a warm oven to melt the cheese and avoid the dark spots that is great too!
 
<


Not only did this sweet little recipe help clean out my fridge and pantry, but it added a little color to my gray November day. I hope you enjoy it!
 
post signature


Thursday, October 31, 2013

Pumpkin Cheeseball and Severed Witch fingers- A sweet and GOOLISH treat!

 
HAPPY HALLOWEEN!
Here are a few treats I made today, for the special occasion.
They're easy, fast and super YUMMY!
These recipes also work well if you are planning a get together in a hurry.
At the end of the post is a quick and simple centerpiece I made today as well.
 
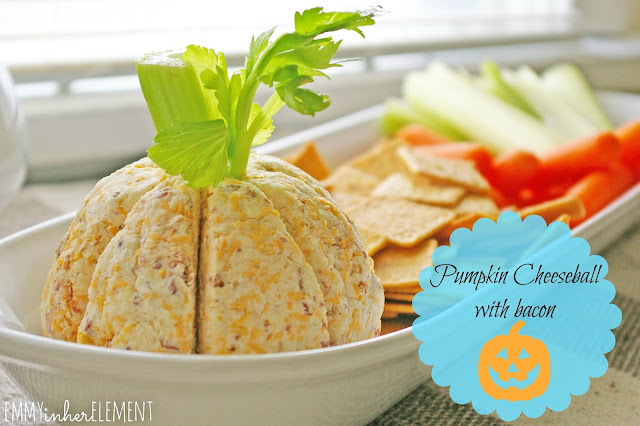
First I will start with my Cream cheese and bacon cheese ball.


Recipe:
 
1 8 oz package of cream cheese chilled
1/4 teaspoon onion powder
1/4 teaspoon Garlic powder
1/4 teaspoon salt
1/4 teaspoon chili powder
2 cups of cheese (I used a mix of cheddar and pepper jack)
a pinch of cayenne powder
1/2 teaspoon creamy horseradish
1/4 cup Hormel bacon bits.
 
 
Mix all ingredients together and form into a ball. Use wax paper to help you form it if the ball is too sticky. Put the ball into the fridge to chill and harden back up. Then after it has chilled, take a butter knife and make slices down the edges of the ball to resemble a pumpkin. Add a celery stock and leaf to the top for the stem.
Serve chilled with crackers, carrots, celery and any other veggies or snacks you prefer. 


Next recipe is a fun one I found on the food network here for severed witches' fingers.
This recipe is super easy, super cute, and super fast!


Recipe:
 
Dry ingredients:
2 cups all purpose flour
1/2 teaspoon baking powder
1/4 teaspoon salt
whisk together.
 
 
Wet ingredients:
Cream together 1 stick of butter and 1 cup of sugar.
Add 1 room temperature egg
and 1 teaspoon vanilla
 
Add the dry ingredients in two batches.
Mix well.
 
Take a tablespoon of the dough and form it into a finger (bread stick shape). Make an indentation with your thumb at the end of the finger, and add a slivered almond on top.
 
Take a paring knife and cut about 3 quarters of the way down into the dough. Make a few lines that resemble a knuckle.
 
 
Bake at 325 degrees for 15 minutes or until golden brown.
Cool fully and then dip in a little bit of warmed up raspberry or strawberry jam.


I also made a little table centerpiece that was fast and simple and very inexpensive!
Here's how I did it...
 
I started by trimming a few branches from a tree in my yard. I had a half empty can of black spray paint in my basement so I thought there was no better time to use it!
Spray paint the branches black and let them dry. Then add them to a mason jar filled with candy corns and tie a colorful ribbon around the neck.


 Have a very SPOOKY DAY!
 
post signature


Tuesday, October 29, 2013

Crockpot Teriyaki Chicken with rice

 This recipe is full of flavor that your family will love, and the best part is that the crockpot does most all the work for you!
I think the shredded chicken teriyaki is best served over a bed of sticky white rice with a side of fresh and tangy pineapple. You could also add sautéed onions, broccoli, and carrots on top for some added veggies and color! Sprinkle sesame seeds on top for a little crunch.


 Recipe:
5 Large chicken breasts (I used frozen so mine took longer to cook)
1 3/4 cups pineapple juice (or the juice from two cans of chunky pineapple)
1/2 cup of oil (you can use vegetable or olive oil)
1/2 cup soy sauce
1 1/2 cups brown sugar
2 teaspoons salt
1 teaspoon garlic powder
1 teaspoon onion powder
1/4 teaspoon pepper
 
Whisk all ingredients together and pour over chicken in the crockpot. YOU WILL FEEL LIKE THERE SHOULD BE MORE LIQUID FOR THE CHICKEN TO COOK IN BUT THE MEAT WILL REALEASE SO MANY JUICES AS IT COOKS!
My chicken was frozen so I cooked it on high for 4 hours in my crockpot.
The chicken is done when you can take two forks and it shreds easily.
 
While the chicken is cooking, about 30 minutes before it is done, you will want to make your rice.
I have tried a lot of different rice and I really like the Jasmine rice by Imperial Dragon. It cooks easily and it is very authentic tasting because it is a sticky rice and very fluffy. Follow the directions on the package for the right amount to make for your family.
 
When the chicken is done, remove it from the crockpot and place it on a cutting board or large plate. Shred the chicken breasts and set aside...
Take the leftover sauce in the crockpot, and pour it over a strainer into another bowl, eliminating the sauce of the small fatty pieces from the chicken and to make a clear sauce. Add the chicken back into the crockpot and pour half of the liquid over it to keep it moist.  Add the remaining sauce to a saucepan with a little corn starch and boil it until it makes a thick glaze. Dish up a plate of rice, Chicken and glaze on top. Add pineapple skewers on the side. You can always add vegetables on top and some sesame seeds for garnish. Also, If you would like to add a little spice, you can sprinkle some red pepper flakes in your sauce or you can add some sweet chili sauce.
 
This amount serves 6 adults.
 
NOTE: this meal is GLUTEN FREE as long as your soy sauce and other ingredients are gluten free and not processed in a place where gluten is present.


Hope you enjoy it!
p.s. This recipe, like many that I post, is my own recipe brought to life through pure experimentation in the kitchen. If you try it and have any new ideas or did something a little different that worked better for you, I would love to hear your comments :)
 
xoxox
 
post signature

Sunday, October 27, 2013

3 Cheese Jalapeno Poppers


This is one of our family's Sunday night Football treats. They also work great to take to parties, or have for special occasions. You can make them as spicy or mild as you like.
Hope you enjoy!!!
 
Recipe:
5-6 medium sized jalapenos cut in half lengthwise
1 8oz package of cream cheese softened almost to room temperature (whole fat cream cheese keeps the best texture) 
1/4 teaspoon garlic powder
1/4 teaspoon salt
1/4 teaspoon chili powder
a pinch of cayenne pepper (omit this if you want them less spicy)
1/2 cup of bread crumbs to roll the poppers in (I love to use Italian)
NOTE: This recipe can easily be made Gluten Free by switching the bread crumbs out for Japanese Panko bread crumbs which add great texture and are gluten free
 6 bacon strips (I use the canned Hormel canned bacon bits I think they work great and it saves me the work and time of cooking the bacon)
1 cup sharp cheddar cheese
1 cup Monterey jack cheese
 
Mix together the cream cheese, bacon, cheddar and Monterey cheeses, garlic and chili powder, salt and cayenne pepper.
Slice your jalapenos in half. Gut the seeds with a small spoon or ice cream scoop. Add a spoonful of the filling to the pepper and press it down with your fingers.
Pour a 1/2 cup of your bread crumbs into a pie pan, and roll the tops of the peppers in the bread crumbs so that the stuffing is covered.
Place into a preheated oven of 300 degrees and cook for 20 minutes for spicy, 30 minutes for medium, and 40 minutes for mild.
 
Since I really like spicy bites but prefer my peppers to cook a little longer, I make them more spicy by adding more cayenne. You can mess with it and taste the filling before you cook them to decide.
 
Be careful any time you work with hot peppers to WASH YOUR HANDS and do not touch your eyes or other areas until your hands have been cleaned. You could be in some serious pain!


Happy Sunday!
post signature


Friday, October 25, 2013

Wreath making tutorial {Part 2}

For part two of this wreath making series, I will demonstrate how to make a two toned burlap wreath. I made this wreath in both a large and small size. I will show you a few pictures from both.
If you missed part 1 of this post, go HERE


Supplies needed:
 
1. A foam wreath from Walmart or the Dollar store.
2. 2 yards or a large roll of regular burlap + 2 yards of a lighter color of burlap or roll of lighter colored burlap.
3. Hot glue gun and glue sticks for days :)
4. Embellishment's of your choice such as, leaves, raffia, fall flowers, fake gourds or pumpkin's, Christmas ribbons or poinsettia's.

 
Through trial and error, and cutting out A LOT of 5"X5" burlap squares, I discovered that it may be quicker and easier to buy the burlap on a spool. Check your local craft store for this. You should be able to find it and just cut 5" cuts in length down the ribbon. If you are unable to find the lighter tone in burlap, try getting a thinner burlap, so when you add it next to the thick burlap squares, it will create a new and pretty texture.
 
To start, make sure and wrap the full wreath with burlap so if there are any bald spots, you wont be able to see the foam through them. ALSO, hot glue does not stick to foam, it just melts it. You will need the burlap base to help glue the squares on.


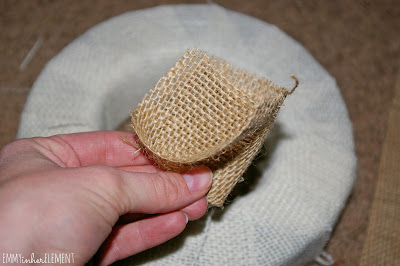
Now take a 5x5 inch square, and fold it in half.


Put a little hot glue  down the center, and fold it in half again.


THIS NEXT STEP WILL SAVE YOU LOTS AND LOTS OF HOT GLUE BURNS ON YOUR FINGERS!
I discovered that if you take an extra piece of burlap, and set it over the top of the burlap square that you just glued on, this will save you from getting a glue burn (a popsicle stick works great too). The burlap has a lot of holes where the glue can come through. Hold the extra burlap over the glued piece for about 30 seconds. If you take the pressure off too soon, the square will open back up or fall off. Make sure to keep it on there long enough that it will be securely in place. Now remove your extra piece, and continue to do this all over the wreath until it is filled in and fluffy. There is no rhythm or rhyme about gluing the different colors, just try to spread them out evenly. 


As you can see, I wanted to see what the embellishment would look like before I finished the wreath.(I'm impatient like that.) I added some raffia, fall flowers and faux leaves from the dollar store. I think they look so pretty and there are so many different things you could add. I like to place my embellishments about 4 o'clock on the wreath.
 

Here are a few pictures from the larger one I made.


I think the red poinsettia looks so pretty against the neutral colors of the burlap.


I hope you enjoyed this tutorial, and I would be soo happy to see what you come up with in your crafting. Feel free to email me or ask any questions, and if you feel like you want to share your wreath, please post a picture on my Facebook page!
 
 
 xoxoxo 
post signature


Blogging tips