

Showing posts with label Handmade gifts. Show all posts
Showing posts with label Handmade gifts. Show all posts
Thursday, April 2, 2015
Wednesday, April 1, 2015
Crafting with kids: easy Easter egg paper art

Monday, March 30, 2015
Crafting with kids: DIY butterfly snack bag

Today is day 2 of my week of Easter crafts. Be sure and check in with me on my INSTAGRAM so you don't miss out on any extra goodies I may only post on that account.
I am having so much fun already making extra time to craft with my little ones. If the words "craft" or "DIY" scare you, fear not! These are simple activities that I have my 2 1/2 and 5 year old doing mostly themselves.
I love giving my children reasons to use their imagination and creativity. In this day and age there is so much brain drain with TV, electronics and toys with instant gratification and entertainment.
I love to watch my children's faces as homemade projects come together and they are so proud of their work.
Wednesday, February 25, 2015
DIY easy yarn tassel for decorating

This past weekend I hosted a baby shower for my friend. Being the thrifty chick I am, I tried to make as many decorations from scratch as possible, saving me money and giving my party a unique and original look.
Tuesday, February 10, 2015
Sweet cherry Pocket Pies

Recipe: Sweet cherry pocket pies
Recipe source: Emmy in her Element
What you'll need:
1 can cherry pie filling
1 batch homemade pie dough or store bought dough
{For homemade dough you will need: 2/12 cups all purpose flour, 1 cup Crisco shortening, 1 teaspoon salt, and about 8 tablespoons ice water}
1 beaten egg
A heart shaped cookie cutter
Friday, February 6, 2015
Free Baby shower invitation template and floral wreath clip art

Wednesday, February 4, 2015
Anniversary Questionnaire

Monday, December 8, 2014
DIY mini burlap trees

Have you seen those darling mini trees at TJMAXX that you can use to decorate your mantel? I really like them but they are around 20$ each! I decided to make my own for much cheaper.
I think they would be so fun to hand out to friends instead of candy. They smell like Christmas and add a fun decorative touch anywhere they are!
To see some of my other Christmas décor go here.
Monday, November 24, 2014
DIY Christmas Burlap banner

Normally Christmas does not make any kind of appearance until after Thanksgiving at our house. This year? I broke the rules! I couldn't help it, the Christmas spirit got a hold of me early and up the tree went. I have enjoyed it's cozy glow every evening for two weeks now.
I am not much into cluttery décor, this year especially I have cut back and simplified everything.
I do not have a pretty mantle to decorate so instead a made this quick, easy and beautiful burlap banner to hang from my headboard. I love the simple hint of Christmas it adds.
I am going to show you how I did it so you can make one too. Wouldn't this be fun to hand out to friends?
Monday, October 6, 2014
DIY Halloween burlap banner

Wednesday, July 16, 2014
Homemade {ALL NATURAL} Lavender Bath Fizzies for relaxation

Wednesday, July 2, 2014
Homemade Bath Fizzies {perfect for congestion and sore throats}


Friday, March 14, 2014
How to make a 5 minute no sew table runner, plus a fun new centerpiece from collections around the house


As for the centerpiece, I gathered up a few things from around the house. A few pretty plates and a tiny china cream pitcher, a terra cotta planter with a fake thyme herb plant. A vintage book, because exposed book backs and pages make my heart skip a beat, and a pretty doily from Grandma. All on top of a sweet shabby tray found from Vintage Farm Furniture. All other items, thrifted.


Saturday, November 9, 2013
How to plan an inexpensive party that still looks adorable!

I thought tonight I would share how I planned and executed a really cute and inexpensive party for my 4 year old little boy. This party doesn't have to just be for kids though, it would be super fun to do as a one on one or group date, for a family reunion or friend party!
I have struggled for ideas for fun birthday parties since there are less options for things to do in the winter weather. I was first inspired by this idea of doing an "at home drive in movie" on Pinterest, but with a little creativity, my husband and I were able to switch things up a little from the original posts I had seen. He suggested that it would be fun to have the kids color their own car instead of us doing all the work before hand. GENIUS!
Here are a few steps of how I put together the party, on a dime. I was able to borrow a few things, and use a lot of what I already had at home to make the decorations. Forcing yourself to get a little creative with things you already have can really stretch a buck. Plus we can even say we are going green by reusing what we have one more time... ok maybe it's a stretch but it's a start!
Here's a step by step guide to a party on a dime. Hope you enjoy!
THE INVITATION(as seen above)
I designed for free on picmonkey.com and then the prints were ordered through Costco for only 13 cents/invite.
THE CARS
The cars are made from cardboard boxes purchased from Home Depot for $1.30/box. We painted them with 1 layer of cheap white paint we had in our basement. I bought black paper plates from the dollar store (24 plates per package) and with 2 packages I had enough for 10 cars and some leftover. Total cost, $2. Next, I hot glued them on for tires. I chose to use Vinyl lettering to add the children's names to the top of the car. I printed it myself so it was inexpensive, but to save on cost you could just paint or write the name in marker, and color two yellow head lights on.


THE TABLE SETTING
For the simple table setting, I used plates and cake holders to stack and add height to my table and to make it a bit more visually pleasing.
The balloons were about 99 cents a piece, and using gold blue and red added a more "circus-y, vintage-y" kind of feel. I had a tablecloth that I purchased from a spool of clearance fabric at Joanne's a few years ago. It's neutral brown color matches just about anything I do. If you have never looked at Joanne's section of tablecloth fabric, check it out!
The popcorn machine was a total hit, and it was no added cost because I borrowed it from a family member. A similar one can be found HERE at Shopko.com
I made the banner last summer for my 4th of July using scrapbook paper and gluing it onto twine. It happened to match so I thought it would add some extra color and help add height to my table décor.

I made the banner last summer for my 4th of July using scrapbook paper and gluing it onto twine. It happened to match so I thought it would add some extra color and help add height to my table décor.


Did you know that instead of buying labels you can just make your own cute ones in Microsoft word? UM YES PLEASE!
Its so easy Ill be making a post to share this secret very soon.
I made my own label, printed it and glued it to some old scrapbook paper I had in storage.


For the popcorn cups I did the same thing, and then just glued them to a clear cup so you can see the pretty golden popcorn inside.

I covered the original label for the licorice and changed it to "old fashioned licorice" to add more to the vintage feel. Adding it on top of a cake stand made it extra special!


THE CAKE
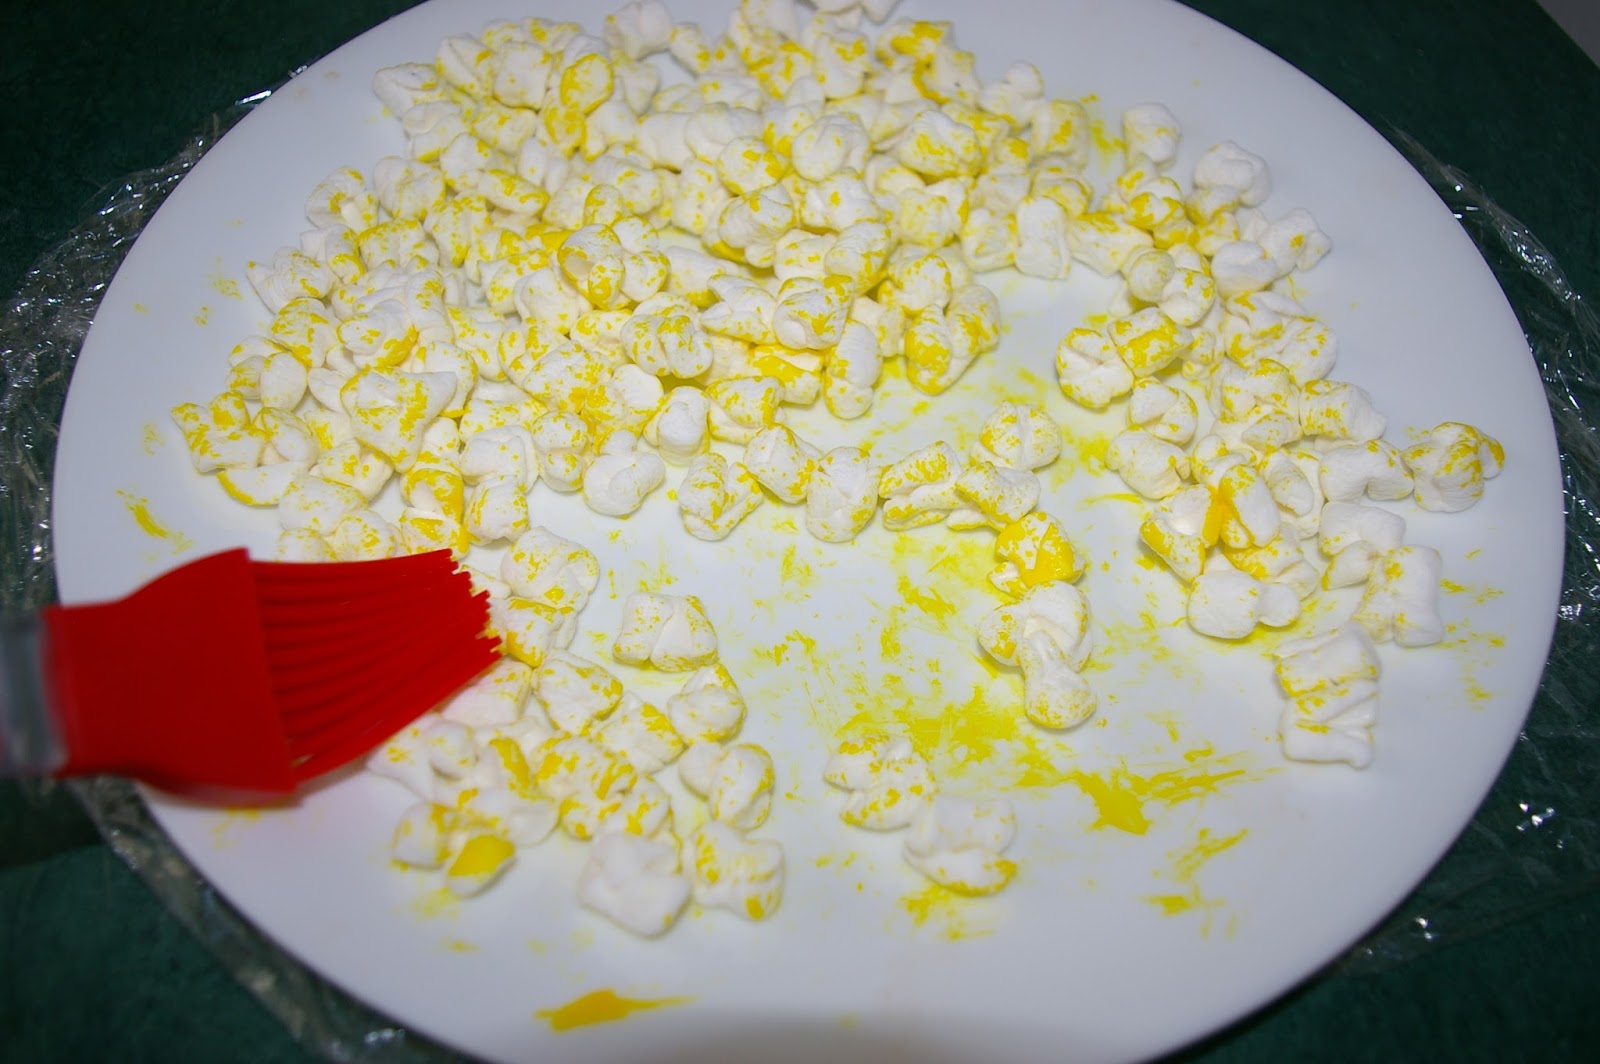
I thought it would be fun to just do a simple but creative cupcake for the party. After learning how easy it is to create a popcorn look-a-like cupcake, I knew this was the perfect compliment to my table.
To save money on the cake, bake your own made from scratch cupcakes, and homemade buttercream frosting. Frost the cupcakes once they are cooled, and immediately add your faux popcorn topping.
These are so dang easy you will laugh. All you have to do is take some mini marshmallows, cut them twice with kitchen sheers, and then brush a little bit of yellow food coloring (I used gel) on the tops. Let the gel dry for about 20-30 minutes before using so it doesn't get all over your fingers.


I bought these cute little cupcake covers at the same party store I purchased the balloons. They were only $2.39 for 12.
THE PARTY FAVORS
I made little baggies filled with "movie treats" for the kids using dollar store candies.
Then I filled other baggies full of stickers and crayons also purchased from the dollar store. Total cost for 100 crayons, candy for 10 kids, and 200 stickers... $11.00.
I found that putting them In individual packages for the boys and the girls helped the decorating process go very smoothly with no chaos! Just what a mommy needs :)


The kids got to watch Monsters University, eat popcorn, treats and decorate a car. Then we opened gifts and enjoyed cupcakes. Overall I think it was a hit, and I loved hearing the kids giggle and have a fun time together.
Benson even got to wear shorts... in November. :)


Happy 4th Birthday Benson, you are so loved!
xoxox

Friday, October 25, 2013
Wreath making tutorial {Part 2}
For part two of this wreath making series, I will demonstrate how to make a two toned burlap wreath. I made this wreath in both a large and small size. I will show you a few pictures from both.
If you missed part 1 of this post, go HERE


Supplies needed:
1. A foam wreath from Walmart or the Dollar store.
2. 2 yards or a large roll of regular burlap + 2 yards of a lighter color of burlap or roll of lighter colored burlap.
3. Hot glue gun and glue sticks for days :)
4. Embellishment's of your choice such as, leaves, raffia, fall flowers, fake gourds or pumpkin's, Christmas ribbons or poinsettia's.

Through trial and error, and cutting out A LOT of 5"X5" burlap squares, I discovered that it may be quicker and easier to buy the burlap on a spool. Check your local craft store for this. You should be able to find it and just cut 5" cuts in length down the ribbon. If you are unable to find the lighter tone in burlap, try getting a thinner burlap, so when you add it next to the thick burlap squares, it will create a new and pretty texture.
To start, make sure and wrap the full wreath with burlap so if there are any bald spots, you wont be able to see the foam through them. ALSO, hot glue does not stick to foam, it just melts it. You will need the burlap base to help glue the squares on.


Now take a 5x5 inch square, and fold it in half.


Put a little hot glue down the center, and fold it in half again.


THIS NEXT STEP WILL SAVE YOU LOTS AND LOTS OF HOT GLUE BURNS ON YOUR FINGERS!
I discovered that if you take an extra piece of burlap, and set it over the top of the burlap square that you just glued on, this will save you from getting a glue burn (a popsicle stick works great too). The burlap has a lot of holes where the glue can come through. Hold the extra burlap over the glued piece for about 30 seconds. If you take the pressure off too soon, the square will open back up or fall off. Make sure to keep it on there long enough that it will be securely in place. Now remove your extra piece, and continue to do this all over the wreath until it is filled in and fluffy. There is no rhythm or rhyme about gluing the different colors, just try to spread them out evenly.


As you can see, I wanted to see what the embellishment would look like before I finished the wreath.(I'm impatient like that.) I added some raffia, fall flowers and faux leaves from the dollar store. I think they look so pretty and there are so many different things you could add. I like to place my embellishments about 4 o'clock on the wreath.

Here are a few pictures from the larger one I made.


I think the red poinsettia looks so pretty against the neutral colors of the burlap.


I hope you enjoyed this tutorial, and I would be soo happy to see what you come up with in your crafting. Feel free to email me or ask any questions, and if you feel like you want to share your wreath, please post a picture on my Facebook page!
xoxoxo

Subscribe to:
Posts (Atom)


share this post »