Showing posts with label Tricks in the Kitchen. Show all posts

Saturday, December 20, 2014

How to create an AWARD WINNING Garnish in a few easy steps

 Last weekend I had the opportunity to help out one of my family members by creating a few delicious desserts to enter into his Holiday work party.
We decided to make my mini cheesecakes with raspberry swirls as well as these cupcakes with a beautiful garnish. I guess I am going to have to come up with a name with them huh?
To my great surprise, the cupcakes took the grand prize! I was so excited I had to share with you how easy it was to create this beautiful garnish. It looks intimidating but really in just a few super easy steps, anyone can make it.

Friday, May 30, 2014

How to frost a beautiful cake with a butter knife and tin foil


Ready to ditch the piping bags, fancy cake frosting equipment and sprinkles? Today I'm going to show you a quick and easy way to frost a simple but beautiful cake with just a butter knife and some tin foil. You can use wax paper too. In no time flat you will have a dessert that looks as pretty as it tastes!
 
My first tip for frosting a perfect cake, is to make your cake ahead and freeze it. The cake will stay fresh in the freezer, and when you are ready to frost it, just pull it out and you're all ready to go. Freezing the cake makes it super easy to frost without getting those little cake crumbs smeared all around in the pretty frosting. If you don't have time to freeze ahead, you can still use this process you will just have to be a little more careful as you frost not to dig up the cake.
 
Next step, use a little tin foil or wax paper and rip off four pieces. I liked using tin foil because I folded it down over the edges so it would stay put. You want to keep it close to the edges because we are going to pull these off after we frost our cake.


Next, place your first layer of cake on the pan. Plop the frosting in the top center and spread it around the top of the cake leaving 1/2 inch border. This will leave a little space for when you top the cake with the next layer and the frosting "squishes" a little.


The next important tip for cake frosting is to make sure and frost from the TOP down. That means you only want to add more frosting to the very top of the cake, and use your knife to spread it down to the bottom in small circular motions.

 
Now that the cake is fully covered, we are going to make small circular motions all over the cake to fancy it up a bit. Just use your butter knife. It doesn't have any rhyme or reason, just random circles to make a beautiful cake.

 
Slowly and carefully pull/shake your tin pieces out from under the cake.

 
I topped mine with fresh raspberries for a pop of color and simplicity. Cherry's would be gorgeous too for a more vintage look.


Now go impress your guests with your no mess cake!
 
 
post signature

Wednesday, April 2, 2014

2 simple tips that will change the look of your pie crust


I love to make pies and find so much satisfaction in sharing something beautiful that I put love into and made myself. I'll tell you though, pie making did not come naturally to me. It has taken practice and patience... and yes a few tear drenched crusts have been tossed in the trash...
So today, I want to share with you a couple of tips I have learned to make a beautiful top crust on my pies. The best part, they are easy tips that will make for a much prettier end result.
 
 TIP 1: Instead of exposing the top crust to the hot oven for the total time of baking, try cutting a small piece of tin foil and lightly placing it on the top of your pie. Bake for 1/2 the time, open the oven and pull it off (use a hot pad). Toss the foil and let your top crust beautifully brown for the other half of the bake time. Its a small tip that makes a big difference.
 
TIP 2: Always add a wash on top of your pies to help them be golden. Without the wash, your crust will stay a whitish color, the same as your dough looks. My Grandmother has always used a cream and sugar wash, and I always go with the traditional egg wash. It's easy just crack 1 egg in a cup, and add about a teaspoon of water. Whip with a fork until fluffy. Brush this wash onto your crust, and then sprinkle sugar over the top. The wash helps the sugar stick. Keep sprinkling all over the crust as a little will dissolve into the wash. Bake your pie and when you pull it out, you will see pretty parts of it where the sugar sparkles. It adds a wonderful rusticity to the pie.
 
post signature

Monday, October 21, 2013

Death by Chocolate- A beautiful and delicious chocolaty treat


As promised, here is recipe #3 from my Grandma's party. If you missed recipe #1, sparkle and spiced cider go here,
and #2 salted caramel apple pie go here!.
 
I am excited about this recipe because I made it as Gluten Free option. My mom has celiac disease and I wanted to have a dessert that she could enjoy with the rest of the group.
This can easily be made with regular chocolate cake mix as well.
 
This dessert is super easy, delicious to eat, and beautiful to look at. I am going to teach you a really fun trick so you can fake the "fanciness" of it :)
 
First of all, you will need some milk chocolate chips, and some white chocolate chips.
 
 
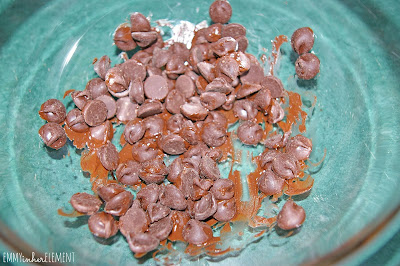
Start by adding the milk chocolate into a bowl. I didn't need much for this, just a small handful.
Now let them melt in the microwave for 20-30 seconds. Pull them out and stir. It will look like this.


Now pop them back in for another 15 seconds. Stir again. It will look like this.
 
 
Heat them again for another 10 seconds and add about 15 new chocolate chips.
 
 
 Heat again for about 7-10 seconds. Remove and stir and the chocolate should be silky smooth. The key here is that we are doing a quick temper on the chocolate. The lower temp you keep it, the faster it will set up and harden for you and keep its hardened shape. All microwaves are different so sure and not overheat it!
 
 
 You want to be really careful to stir in between heating sessons, or you will seize the chocolate and it will become dry and curtled and unworkable.
 
Next, spread out a sheet of wax paper on a cookie sheet.
 Take your bowl of chocolate and dip a fork into it. Pull the fork out of the chocolate and with a quick flick of your wrist in a "tic tac toe" shape, create a pretty little messy design on the wax paper.
Be quick going back and forth so the chocolate doesn't come down in clumps. You want it to be in tiny little lines.
 
 
 After you fill the tray, go back to the microwave and do the same thing with the white chocolate. I only had to heat mine (a small handful) for 70 seconds. It melted quicker than the milk chocolate.
 
-
Take it over to your pan and drizzle white chocolate over the dark chocolate you already did. Isnt it so pretty?


Now pop the pan into the fridge or freezer to help it harden.
 
Next ingredient is the strawberries. I used 1 small carton and sliced them up into small slices.
Whip some heavy whipping cream, and add a little  powdered sugar to sweeten it.
 
Make a large box of chocolate Jell-O pudding. Let it cool and set in the fridge.
 
 The above ingredients are "naturally" gluten free, but this next step is the most important in making this recipe Gluten Free.
The cake. I love Betty Crocker's Gluten Free version of chocolate cake. It is really good and it is one of the only GF items I have found that you seriously cannot tell that it isn't regular cake mix.
  

 I don't worry about serving it to my other guests because they wont even notice a change in taste or texture.
Make the cake mix and bake it in an 8x8 pan.
Once the cake is cooled completely, cut into small cubes and add to a large bowl. I like to make a little assembly line for the next part. Cake cubes first, then pudding, then strawberries, whipped cream and last but not least, your pretty chocolate garnish. You can pre make these ingredients and keep them in the fridge, or you can let your guests assemble them.


I like to sprinkle a little coco powder on the whipped cream... it looks so pretty :)

 
Now that your garnish has cooled and hardened, it will easily remove from the wax paper and you can set it on the top or side of your whipped cream. I like to do this step at the last minute so that chocolate doesn't soften over time as it sits.


Isn't it stunning?
 
This is a GLUTEN FREE recipe but again, can be made with regular chocolate cake. Make sure that whatever recipe or box mix you use, that it is a more dense cake so that the cubes will hold up with the toppings on them.
I hope you enjoy this as much as we did! :)
Happy experimenting

xoxox

post signature


Friday, October 4, 2013

How to make a Roux (soup, gravy and sauce thickener)

I use this recipe over and over and over as a starter for many homemade soups and sauces. I use it as a base for my creamy broccoli medley, as well as my chicken and shrimp pot pie recipes. Its a great little bit of information to know, and it will help give you the confidence to start experimenting with your own recipes.
Here is how I make a roux. Although the (French) name sounds fancy and intimidating, its not hard at all. Follow these simple steps and you are on your way to knowing one of the best tricks in the kitchen!
 
 
Kitchen How To: Making a simple roux (soup, sauce and gray starter)
Recipe source: Emmy in her Element
 
1.Melt half a stick of butter to your pan on medium-high heat.
2. When the butter is completely melted (avoid browning the butter), add about 1/4 cup flour.
Quickly whisk the flour and butter until smooth. Reduce heat to medium.
3. CONTINUE TO WHISK this mixture as it gets bubbly in the pan. Cooking it for an additional few minutes will help get rid of the "raw flour" flavor.
4. Now add a little bit of milk (1/2-1 cup) and continue to whisk until you get a beautiful creamy sauce.
You can now remove from heat and store in the fridge, or you can slowly add chicken stock, milk or water to continue making your soup.


LOOK AT YOU GETTIN' ALL FANCY IN THE KITCHEN :)


post signature

 
Blogging tips