Thursday, October 31, 2013

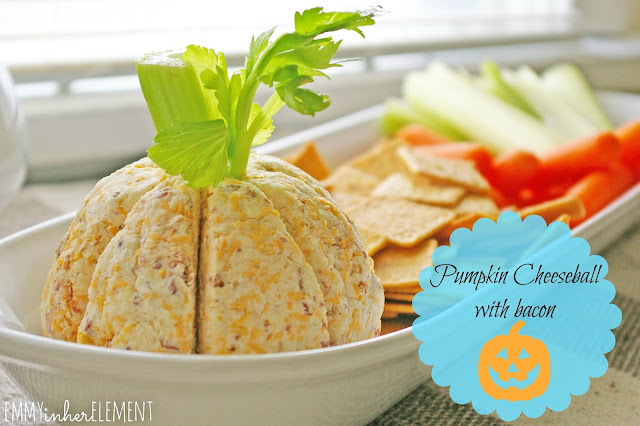
Pumpkin Cheeseball and Severed Witch fingers- A sweet and GOOLISH treat!

 
HAPPY HALLOWEEN!
Here are a few treats I made today, for the special occasion.
They're easy, fast and super YUMMY!
These recipes also work well if you are planning a get together in a hurry.
At the end of the post is a quick and simple centerpiece I made today as well.
 
First I will start with my Cream cheese and bacon cheese ball.


Recipe:
 
1 8 oz package of cream cheese chilled
1/4 teaspoon onion powder
1/4 teaspoon Garlic powder
1/4 teaspoon salt
1/4 teaspoon chili powder
2 cups of cheese (I used a mix of cheddar and pepper jack)
a pinch of cayenne powder
1/2 teaspoon creamy horseradish
1/4 cup Hormel bacon bits.
 
 
Mix all ingredients together and form into a ball. Use wax paper to help you form it if the ball is too sticky. Put the ball into the fridge to chill and harden back up. Then after it has chilled, take a butter knife and make slices down the edges of the ball to resemble a pumpkin. Add a celery stock and leaf to the top for the stem.
Serve chilled with crackers, carrots, celery and any other veggies or snacks you prefer. 


Next recipe is a fun one I found on the food network here for severed witches' fingers.
This recipe is super easy, super cute, and super fast!


Recipe:
 
Dry ingredients:
2 cups all purpose flour
1/2 teaspoon baking powder
1/4 teaspoon salt
whisk together.
 
 
Wet ingredients:
Cream together 1 stick of butter and 1 cup of sugar.
Add 1 room temperature egg
and 1 teaspoon vanilla
 
Add the dry ingredients in two batches.
Mix well.
 
Take a tablespoon of the dough and form it into a finger (bread stick shape). Make an indentation with your thumb at the end of the finger, and add a slivered almond on top.
 
Take a paring knife and cut about 3 quarters of the way down into the dough. Make a few lines that resemble a knuckle.
 
 
Bake at 325 degrees for 15 minutes or until golden brown.
Cool fully and then dip in a little bit of warmed up raspberry or strawberry jam.


I also made a little table centerpiece that was fast and simple and very inexpensive!
Here's how I did it...
 
I started by trimming a few branches from a tree in my yard. I had a half empty can of black spray paint in my basement so I thought there was no better time to use it!
Spray paint the branches black and let them dry. Then add them to a mason jar filled with candy corns and tie a colorful ribbon around the neck.


 Have a very SPOOKY DAY!
 
post signature


Tuesday, October 29, 2013

Crockpot Teriyaki Chicken with rice

 This recipe is full of flavor that your family will love, and the best part is that the crockpot does most all the work for you!
I think the shredded chicken teriyaki is best served over a bed of sticky white rice with a side of fresh and tangy pineapple. You could also add sautéed onions, broccoli, and carrots on top for some added veggies and color! Sprinkle sesame seeds on top for a little crunch.


 Recipe:
5 Large chicken breasts (I used frozen so mine took longer to cook)
1 3/4 cups pineapple juice (or the juice from two cans of chunky pineapple)
1/2 cup of oil (you can use vegetable or olive oil)
1/2 cup soy sauce
1 1/2 cups brown sugar
2 teaspoons salt
1 teaspoon garlic powder
1 teaspoon onion powder
1/4 teaspoon pepper
 
Whisk all ingredients together and pour over chicken in the crockpot. YOU WILL FEEL LIKE THERE SHOULD BE MORE LIQUID FOR THE CHICKEN TO COOK IN BUT THE MEAT WILL REALEASE SO MANY JUICES AS IT COOKS!
My chicken was frozen so I cooked it on high for 4 hours in my crockpot.
The chicken is done when you can take two forks and it shreds easily.
 
While the chicken is cooking, about 30 minutes before it is done, you will want to make your rice.
I have tried a lot of different rice and I really like the Jasmine rice by Imperial Dragon. It cooks easily and it is very authentic tasting because it is a sticky rice and very fluffy. Follow the directions on the package for the right amount to make for your family.
 
When the chicken is done, remove it from the crockpot and place it on a cutting board or large plate. Shred the chicken breasts and set aside...
Take the leftover sauce in the crockpot, and pour it over a strainer into another bowl, eliminating the sauce of the small fatty pieces from the chicken and to make a clear sauce. Add the chicken back into the crockpot and pour half of the liquid over it to keep it moist.  Add the remaining sauce to a saucepan with a little corn starch and boil it until it makes a thick glaze. Dish up a plate of rice, Chicken and glaze on top. Add pineapple skewers on the side. You can always add vegetables on top and some sesame seeds for garnish. Also, If you would like to add a little spice, you can sprinkle some red pepper flakes in your sauce or you can add some sweet chili sauce.
 
This amount serves 6 adults.
 
NOTE: this meal is GLUTEN FREE as long as your soy sauce and other ingredients are gluten free and not processed in a place where gluten is present.


Hope you enjoy it!
p.s. This recipe, like many that I post, is my own recipe brought to life through pure experimentation in the kitchen. If you try it and have any new ideas or did something a little different that worked better for you, I would love to hear your comments :)
 
xoxox
 
post signature

Sunday, October 27, 2013

3 Cheese Jalapeno Poppers


This is one of our family's Sunday night Football treats. They also work great to take to parties, or have for special occasions. You can make them as spicy or mild as you like.
Hope you enjoy!!!
 
Recipe:
5-6 medium sized jalapenos cut in half lengthwise
1 8oz package of cream cheese softened almost to room temperature (whole fat cream cheese keeps the best texture) 
1/4 teaspoon garlic powder
1/4 teaspoon salt
1/4 teaspoon chili powder
a pinch of cayenne pepper (omit this if you want them less spicy)
1/2 cup of bread crumbs to roll the poppers in (I love to use Italian)
NOTE: This recipe can easily be made Gluten Free by switching the bread crumbs out for Japanese Panko bread crumbs which add great texture and are gluten free
 6 bacon strips (I use the canned Hormel canned bacon bits I think they work great and it saves me the work and time of cooking the bacon)
1 cup sharp cheddar cheese
1 cup Monterey jack cheese
 
Mix together the cream cheese, bacon, cheddar and Monterey cheeses, garlic and chili powder, salt and cayenne pepper.
Slice your jalapenos in half. Gut the seeds with a small spoon or ice cream scoop. Add a spoonful of the filling to the pepper and press it down with your fingers.
Pour a 1/2 cup of your bread crumbs into a pie pan, and roll the tops of the peppers in the bread crumbs so that the stuffing is covered.
Place into a preheated oven of 300 degrees and cook for 20 minutes for spicy, 30 minutes for medium, and 40 minutes for mild.
 
Since I really like spicy bites but prefer my peppers to cook a little longer, I make them more spicy by adding more cayenne. You can mess with it and taste the filling before you cook them to decide.
 
Be careful any time you work with hot peppers to WASH YOUR HANDS and do not touch your eyes or other areas until your hands have been cleaned. You could be in some serious pain!


Happy Sunday!
post signature


Friday, October 25, 2013

Wreath making tutorial {Part 2}

For part two of this wreath making series, I will demonstrate how to make a two toned burlap wreath. I made this wreath in both a large and small size. I will show you a few pictures from both.
If you missed part 1 of this post, go HERE


Supplies needed:
 
1. A foam wreath from Walmart or the Dollar store.
2. 2 yards or a large roll of regular burlap + 2 yards of a lighter color of burlap or roll of lighter colored burlap.
3. Hot glue gun and glue sticks for days :)
4. Embellishment's of your choice such as, leaves, raffia, fall flowers, fake gourds or pumpkin's, Christmas ribbons or poinsettia's.

 
Through trial and error, and cutting out A LOT of 5"X5" burlap squares, I discovered that it may be quicker and easier to buy the burlap on a spool. Check your local craft store for this. You should be able to find it and just cut 5" cuts in length down the ribbon. If you are unable to find the lighter tone in burlap, try getting a thinner burlap, so when you add it next to the thick burlap squares, it will create a new and pretty texture.
 
To start, make sure and wrap the full wreath with burlap so if there are any bald spots, you wont be able to see the foam through them. ALSO, hot glue does not stick to foam, it just melts it. You will need the burlap base to help glue the squares on.


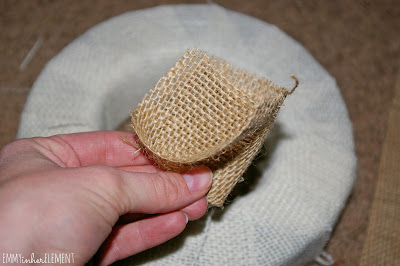
Now take a 5x5 inch square, and fold it in half.


Put a little hot glue  down the center, and fold it in half again.


THIS NEXT STEP WILL SAVE YOU LOTS AND LOTS OF HOT GLUE BURNS ON YOUR FINGERS!
I discovered that if you take an extra piece of burlap, and set it over the top of the burlap square that you just glued on, this will save you from getting a glue burn (a popsicle stick works great too). The burlap has a lot of holes where the glue can come through. Hold the extra burlap over the glued piece for about 30 seconds. If you take the pressure off too soon, the square will open back up or fall off. Make sure to keep it on there long enough that it will be securely in place. Now remove your extra piece, and continue to do this all over the wreath until it is filled in and fluffy. There is no rhythm or rhyme about gluing the different colors, just try to spread them out evenly. 


As you can see, I wanted to see what the embellishment would look like before I finished the wreath.(I'm impatient like that.) I added some raffia, fall flowers and faux leaves from the dollar store. I think they look so pretty and there are so many different things you could add. I like to place my embellishments about 4 o'clock on the wreath.
 

Here are a few pictures from the larger one I made.


I think the red poinsettia looks so pretty against the neutral colors of the burlap.


I hope you enjoyed this tutorial, and I would be soo happy to see what you come up with in your crafting. Feel free to email me or ask any questions, and if you feel like you want to share your wreath, please post a picture on my Facebook page!
 
 
 xoxoxo 
post signature


Blogging tips