

Monday, August 25, 2014
Ham and turkey salad sandwiches- perfect for a party food or light lunch


Tuesday, August 19, 2014
Headboard before and after and a bedroom update
The moral of this story is going to be this- I am a procrastinator. 3 years ago my husband and I had a fight. Ok well, we have had a few fights since then, but that is beside the point. It was early December, finals were coming up, stresses were high and we had a fight. My husband is a dear, and he fights better than I do. What I mean by that is, I use my words as a weapon and say things I don't mean when I am mad. Or maybe some of the things I do mean, but they come out sounding like I am throwing a hatchet when really, if I took a moment to calm down and wait until I could say them a little nicer (or quieter) they wouldn't sound so bad. As for Shaun, he fights fair. He is a calm fighter, and when I really push him to his limits, he takes a moment to calm down and let things cool off instead of acting like... well, me. I love him for that and I am hoping to be better.
Anyway, that day in December when we were mad, he left for a little while. While he could have been off doing something for himself, studying, shopping for man toys, hunting or whatever the heck guys do when they are mad at their wives, he did something completely the opposite. He went to home depot, bought the materials and constructed a beautiful headboard. He was gone for quite a while, and by the time he came back you can bet I had calmed down, felt bad and was ready to mend things.
For Christmas that December, he surprised me with this beautiful headboard. He spent a lot of time making it perfect, filling all the imperfections with putty and making it as smooth as he could because he knew I would want to paint it.
To say I felt guilty is a big understatement. He knew I had wanted a headboard for a long time, and instead of buying one that we couldn't afford, he built one that we could. It is simple, beautiful and meaningful to me. He started it and I finished it. I love painting furniture and truth be told, this is the first "new" piece I have ever finished. I am really happy with how it turned out, it is so special.
----------------------------------
My very favorite paint to use when I give furniture a new face is, BEHR paint and primer in one. No one is paying me or persuading me to say it. I love it and I continue to use it over and over again. I love the coverage and how it holds up over time. Since I like to decorate in sort of a vintage farmhouse style, I always use the color "Ivory Palace" in satin. It is the perfect combo of cream and white and if you decided to antique your piece with stain, the ivory palace takes it very well, leaving a pretty cream color underneath.
Pre paint:
.jpg)
Layer 1:
.jpg)
Layer 2 and 3. After 3 layers it looked great. I let it dry and my husband was actually able to secure it to our bed just a few hours later. He built it 3 years ago and I was able to paint it in a few hours and have it on my bed. What the heck took so long!? I guess since it is so special to me, and I am used to fixing up old furniture with lots of imperfections, I have been a little nervous.
I love how it turned out.
.jpg)


Tuesday, August 12, 2014
French Apple Galette AKA easy free form apple tart


Recipe for French Apple Galette
Slightly adapted recipe from here
Dough ingredients:
1 cup all-purpose flour
1/2 teaspoon sugar
1/8 teaspoon salt
6 tablespoons butter cubed into small pieces
3 1/2 tablespoons chilled water
1/2 teaspoon sugar
1/8 teaspoon salt
6 tablespoons butter cubed into small pieces
3 1/2 tablespoons chilled water
Filling:
2 pounds about 8 apples (Granny smith, pink lady or any tart firm apple) peeled, cored (save peels and cores), and sliced
2 tablespoons butter melted
3-4 tablespoons sugar
2 pounds about 8 apples (Granny smith, pink lady or any tart firm apple) peeled, cored (save peels and cores), and sliced
2 tablespoons butter melted
3-4 tablespoons sugar
Glaze:
1/2 cup sugar
1 tablespoon lemon juice
peels and cores of apples
cornstarch (optional)
Mix flour, sugar, and salt in a large bowl; add 2 tablespoons of the cold cubed butter. Blend in a mixer or food processer until dough is chunky and butter resembles large peas.
Slowly add in water, stir or pulse and then add remaining cubes of butter until dough just holds together.
Remove dough from food processer and flatten into a 4-inch-thick disk; refrigerate. After at least 15 minutes. On a lightly floured surface, roll into a 14-inch circle about 1/8 inch thick. Flour your rolling pin as well to resist sticking.
Place your dough in a lightly greased 9-inch round tart pan, OR if you are going free form, roll dough up on your rolling pin, and unroll on to your baking sheet covered in parchment paper. Heat oven to 400 F.
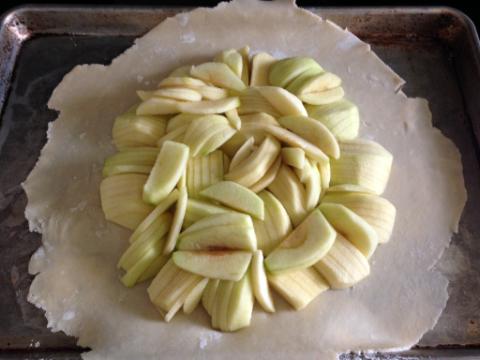
Slice apples thin and neatly arrange on your dough in a ring 2 inches from edge if going galette-style, or up to the sides if using the tart pan or pie dish. Continue inward until you reach the center. Fold any dough hanging over pan back onto itself; crimp edges at 1-inch intervals.
Brush your melted butter over apples and onto dough edge. Sprinkle 1 1/2 tablespoons sugar over dough edge and 2 tablespoons over apples.
Bake in center of oven until apples are soft, with browned edges, and crust has caramelized to a dark golden brown, 40-45 minutes.

To make glaze: Put reserved peels and cores in a large saucepan, along with sugar and lemon juice. Pour in just enough water to cover; simmer for 25 minutes. Strain syrup and add back to pan. Use cornstarch to thicken if desired. (One recipe of glaze made a jar extra that I kept in my fridge for up to 1 week to use on other tarts.
When tart is finished baking, remove from oven, and slide off parchment onto cooling rack. Let cool at least 15-20 minutes.
Brush the glaze over tart, slice, and serve.


If you do not have a pie dish or a tart pan, go ahead and place dough on parchment paper on a baking sheet and build the apple tart galette style (free form), see pics below.


Free form option:


Friday, August 1, 2014
Homemade {no boil} cinnamon and sugar bagels


Wednesday, July 16, 2014
Homemade {ALL NATURAL} Lavender Bath Fizzies for relaxation

Tuesday, July 8, 2014
Super Giant Bubbles- a super fun summer activity!


Wednesday, July 2, 2014
Homemade Bath Fizzies {perfect for congestion and sore throats}


Wednesday, June 18, 2014
Chewy and puffy GLUTEN FREE chocolate chip cookies.


Wednesday, June 11, 2014
Homemade Apple Blossoms and my favorite pie dough recipe


Saturday, June 7, 2014
Strawberry-Orange Yogurt Muffins

Strawberries were on sale at Costco this week and I couldn't help myself... even though I knew deep down I wouldn't be able to eat the entire package before they expired, I bought them anyway. I figured it would force me to get a little creative and use them, instead of tossing what we couldn't finish. Sure enough, I stumbled upon this delicious recipe over at Baked Perfection for strawberry muffins. I really liked the recipe the first time I made it, but I had an idea that I thought would put it over the top... adding the orange. Did you know that strawberry and orange together make magic? Well its true... and this recipe proves it.
Recipe: Strawberry-orange yogurt muffins
Recipe from Emmy in her Element Adapted from Baked Perfection
Makes 12 muffins
2 eggs
2/3 cup white sugar1/2 cup vegetable oil
1 teaspoon vanilla extract
2 cups all-purpose flour
1/2 teaspoon salt
1/2 teaspoon baking soda
1 teaspoon cinnamon
1/2 cups vanilla Greek yogurt
1/8 cup fresh orange juice
1 1/2 teaspoons orange zest
1 1/2 cups diced strawberries
Heat oven to 400 degrees F. Pre grease muffin tin with pam or use muffin liners.
In a medium bowl mix together, eggs, sugar vegetable oil. yogurt, orange juice, vanilla, and zest.
Combine flour, soda, salt and cinnamon and add slowly to wet ingredients mixing just until incorporated. Fold in strawberries. Scoop into muffin tins until filled and bake for 18-20 minutes or until muffins have popped up and are golden brown on top. Let cool and serve within 24 hours or freeze in a ziplock when cooled to room temperature.

Be sure to enjoy these muffins within 24 hours as the strawberries soften significantly after baking. These work great to make ahead and freeze if you don't need them until later!


Friday, May 30, 2014
How to frost a beautiful cake with a butter knife and tin foil


Next, place your first layer of cake on the pan. Plop the frosting in the top center and spread it around the top of the cake leaving 1/2 inch border. This will leave a little space for when you top the cake with the next layer and the frosting "squishes" a little.


The next important tip for cake frosting is to make sure and frost from the TOP down. That means you only want to add more frosting to the very top of the cake, and use your knife to spread it down to the bottom in small circular motions.

Now that the cake is fully covered, we are going to make small circular motions all over the cake to fancy it up a bit. Just use your butter knife. It doesn't have any rhyme or reason, just random circles to make a beautiful cake.

Slowly and carefully pull/shake your tin pieces out from under the cake.

I topped mine with fresh raspberries for a pop of color and simplicity. Cherry's would be gorgeous too for a more vintage look.


Subscribe to:
Posts (Atom)


share this post »