Wednesday, November 20, 2013

Barefoot Contessa's Lemon Yogurt pound cake


This week I was craving some kind of lemon-poppy seed deliciousness so I looked up a few recipes and decided on this one. I was so pleasantly surprised, I had to share it with you.
I substituted a few things according to my own likes (and what I had in the cupboard) and the result was a delicious moist lemony pound cake. I barely had enough time to snap a pic before my family attacked the tray full of sliced up heaven.
Hope you enjoy it!
 

 Recipe:
1 1/2 cups all purpose flour
2 teaspoons baking powder
    1/2 teaspoon kosher salt                                                   
    1 cup plain yogurt ( I USED SOUR CREAM)                                                  
    1 1/3 cups sugar, divided
    3 extra large eggs                                                  
    2 teaspoons lemon zest, grated (zest of 2 lemons)
    1/2 teaspoon vanilla extract                                                   
    1/2 cup vegetable oil                     
    1/3 cup fresh lemon juice
    (I ADDED 1 teaspoon of POPPY SEEDS)
 
 
Glaze topping:
Powdered sugar
lemon juice
 
Directions:
Preheat your oven to 350 degrees.
Grease an 8 1/2 by 2 1/2-inch loaf pan.
Whisk together flour, baking powder and salt in a medium bowl.

In a different bowl mix yogurt or sour cream, 1 cup sugar, the eggs, lemon zest and vanilla.
Whisk the dry ingredients into the wet, adding it in 3 parts to allow the wet to slowly absorb the dry ingredients.
Once mixed, use a spatula to fold the vegetable oil into the batter.
Pour the batter into your greased pan, and bake for about 47-50 minutes. Toothpick test to make sure it is cooked through. 
    Allow the cake to cool completely before glazing.
    TO MAKE THE GLAZE:
    Mix the lemon juice and powdered sugar together and spread over cake.
    Recipe adapted from Here.


post signature

Sunday, November 17, 2013

{Sunday morning} Oat and Honey breakfast cakes


These lovely little tasty cakes are perfect for a leisurely Sunday morning breakfast. They are packed with tender oats, sweet honey, and whole wheat flour.
Even my pickiest eater was begging "momma! more pancakes!"
While my favorite way to enjoy this breakfast is warm with a little melted butter, they are equally as delicious chilled in the fridge. They make for a great grab and go snack when Monday morning comes and you are short on time.
Hope you enjoy!

Recipe for Oat and honey breakfast cakes
Recipe from: Emmy in her Element


1 cup milk
1 beaten egg
1/4 teaspoon salt
2 tablespoons oil
3 teaspoons baking powder
1/4 cup oats
1 cup whole wheat flour
1 1/2 tablespoons honey- (warm in microwave for 10 seconds to help it incorporate easier)


In a medium bowl, beat one egg. Add salt, oil, baking powder, warmed honey and milk. Mix well. Add whole wheat flour in 2 parts, letting the wet ingredients absorb it slowly. Now stir in oats.
Spray pan with cooking spray, and cook pancakes on medium-low heat. They make take a few minutes to cook through as they are so moist inside.

Serve warm with butter and syrup, plain, or chilled in the fridge.

This recipe makes 7 regular sized pancakes.

Happy Sunday!
xoxoxo

post signature

Saturday, November 9, 2013

How to plan an inexpensive party that still looks adorable!


I thought tonight I would share how I planned and executed a really cute and inexpensive party for my 4 year old little boy. This party doesn't have to just be for kids though, it would be super fun to do as a one on one or group date, for a family reunion or friend party!
 
I have struggled for ideas for fun birthday parties since there are less options for things to do in the winter weather. I was first inspired by this idea of doing an "at home drive in movie" on Pinterest, but with a little creativity, my husband and I were able to switch things up a little from the original posts I had seen. He suggested that it would be fun to have the kids color their own car instead of us doing all the work before hand. GENIUS!
 
Here are a few steps of how I put together the party, on a dime. I was able to borrow a few things, and use a lot of what I already had at home to make the decorations. Forcing yourself to get a little creative with things you already have can really stretch a buck. Plus we can even say we are going green by reusing what we have one more time... ok maybe it's a stretch but it's a start!
 
Here's a step by step guide to a party on a dime. Hope you enjoy!
 
THE INVITATION(as seen above)
I designed for free on picmonkey.com and then the prints were ordered through Costco for only 13 cents/invite.
 
THE CARS
The cars are made from cardboard boxes purchased from Home Depot for $1.30/box. We painted them with 1 layer of cheap white paint we had in our basement. I bought black paper plates from the dollar store (24 plates per package) and  with 2 packages I had enough for 10 cars and some leftover. Total cost, $2. Next, I hot glued them on for tires. I chose to use Vinyl lettering to add the children's names to the top of the car. I printed it myself so it was inexpensive, but to save on cost you could just paint or write the name in marker, and color two yellow head lights on.


THE TABLE SETTING
For the simple table setting, I used plates and cake holders to stack and add height to my table and to make it a bit more visually pleasing.
The balloons were about 99 cents a piece, and using gold blue and red added a more "circus-y, vintage-y" kind of feel. I had a tablecloth that I purchased from a spool of clearance fabric at Joanne's a few years ago. It's neutral brown color matches just about anything I do. If you have never looked at Joanne's section of tablecloth fabric, check it out!
The popcorn machine was a total hit, and it was no added cost because I borrowed it from a family member. A similar one can be found HERE at Shopko.com
I made the banner last summer for my 4th of July using scrapbook paper and gluing it onto twine. It happened to match so I thought it would add some extra color and help add height to my table décor.


Did you know that instead of buying labels you can just make your own cute ones in Microsoft word? UM YES PLEASE!
Its so easy Ill be making a post to share this secret very soon.
I made my own label, printed it and glued it to some old scrapbook paper I had in storage.


For the popcorn cups I did the same thing, and then just glued them to a clear cup so you can see the pretty golden popcorn inside.


I covered the original label for the licorice and changed it to "old fashioned licorice" to add more to the vintage feel. Adding it on top of a cake stand made it extra special!


THE CAKE
I thought it would be fun to just do a simple but creative cupcake for the party. After learning how easy it is to create a popcorn look-a-like cupcake, I knew this was the perfect compliment to my table.
To save money on the cake, bake your own made from scratch cupcakes, and homemade buttercream frosting. Frost the cupcakes once they are cooled, and immediately add your faux popcorn topping.
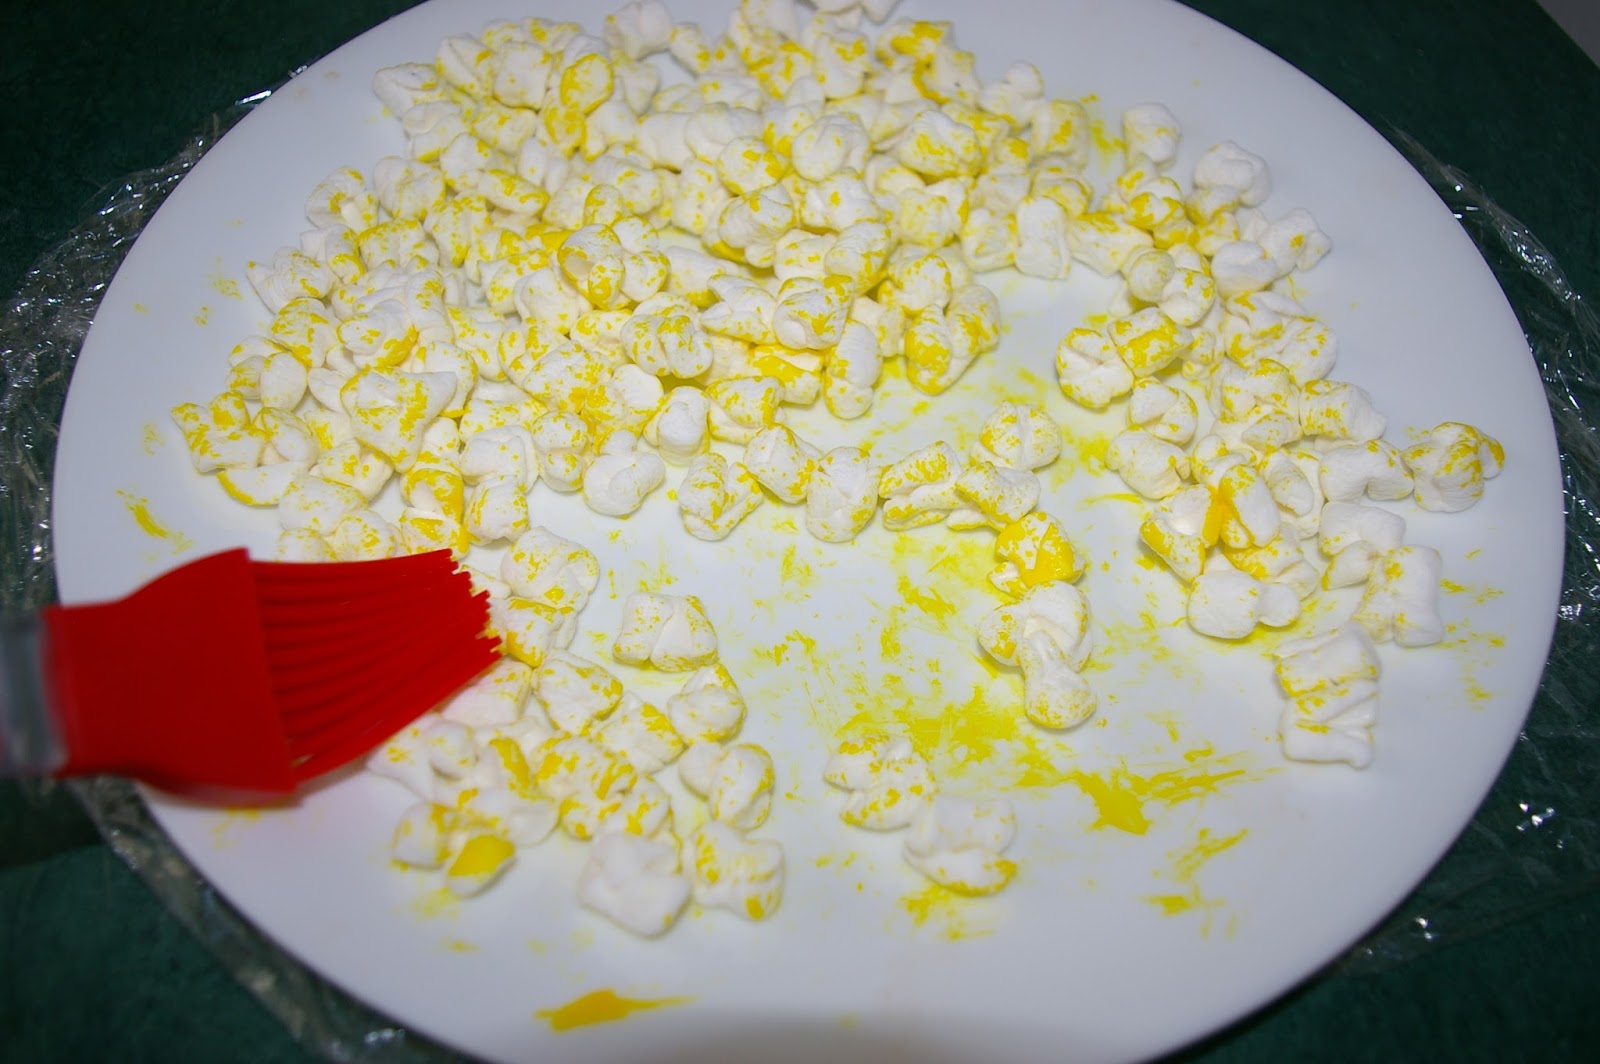
These are so dang easy you will laugh. All you have to do is take some mini marshmallows, cut them twice with kitchen sheers, and then brush a little bit of yellow food coloring (I used gel) on the tops. Let the gel dry for about 20-30 minutes before using so it doesn't get all over your fingers.


I bought these cute little cupcake covers at the same party store I purchased the balloons. They were only $2.39 for 12.
 
THE PARTY FAVORS
I made little baggies filled with "movie treats" for the kids using dollar store candies.
Then I filled other baggies full of stickers and crayons also purchased from the dollar store. Total cost for 100 crayons, candy for 10 kids, and 200 stickers... $11.00.
 
I found that putting them In individual packages for the boys and the girls helped the decorating process go very smoothly with no chaos! Just what a mommy needs :)


The kids got to watch Monsters University, eat popcorn, treats and decorate a car. Then we opened gifts and enjoyed cupcakes. Overall I think it was a hit, and I loved hearing the kids giggle and have a fun time together.
Benson even got to wear shorts... in November. :)


Happy 4th Birthday Benson, you are so loved!
xoxox
 
 
post signature

Thursday, November 7, 2013

Asian Chicken Lettuce wraps- a healthy and flavorful meal


Most chicken lettuce wrap recipes I have found are made with ground chicken. I prefer shredded instead so I'm sharing my version with you for something a little different. These lettuce wraps make a statement with their beautiful bright color and delicious Asian flavors. These make for a great lunch, party side dish, or light and healthy dinner for your family. I hope you enjoy!
 
Recipe:
 
3  large chicken breasts
1/2 cup soy sauce
1 cup water
Cook in the crockpot on high heat until easy to shred.
 
1 small yellow onion chopped
3 garlic cloves minced
1 1/2 tablespoons fresh minced ginger (use ground if that's all you have!)
2 tablespoons butter or olive oil
 
Sauté together on medium heat until onion is tender.
 
Sauce:
2 tablespoons soy sauce
1/2 cup hoisin sauce
4 teaspoons Asian chili sauce
4 teaspoons sesame oil
whisk together
 
Give the shredded chicken a rough chop and add it to the pan with onions, garlic and ginger. pour sauce over the top. Sprinkle with slivered almonds and 1 small can of water chestnuts (roughly chopped).
 
Wash and prepare butter lettuce leaves.

WANT TO KNOW A FAST AND EASY WAY TO WASH AND DRY YOUR LETTUCE?
Rinse and clean lettuce leaves in cool water. Lay out a kitchen towel and place the leaves flat on it. wrap up the towel in the shape of a hobo bag, and hold the towel tight in your hand while swinging your arm in a circular motion to quickly air dry the lettuce. When you open up the towel, the lettuce will be dry as all of the moisture has been whipped into the towel. Cool, I know. :)

You can also use iceberg or romaine lettuce for the wraps, but butter lettuce is my first choice.
I have found that the meat filling is most flavorful when it is served at room temperature or chilled in the lettuce wraps.


 Here are a few pictures using the romaine lettuce. Equally as beautiful to look at, but the butter lettuce is easier to handle and doesn't have the bitterness of the romaine.


post signature


Tuesday, November 5, 2013

Cooking, and how it saved me... plus my Roasted and stuffed Acorn Squash!


Since I became a Mother, November tends to be a much harder time of year for me. I always look forward to fall, the changing colors of the trees, the crunch beneath your feet as you take a walk out to the mailbox and the cool crisp scent of the changing air, making you want to rush back inside for a hot cup of apple cider. Then as the weeks go on, the trees become gray and leaves left dead on the ground lose their color. All the world becomes a bit monochromatic to me... and I find myself low on energy, wanting to sleep longer, and having less motivation to get projects done.
After my first child was born in November of 2009, he had really bad colic for about the first 4 months of his life. We would rock and swing and drive and try everything possible to stop the screaming. I realized after many weeks of this routine that things weren't going to change anytime soon, and I shouldn't expect to get much of anything done in the evenings. This made my days extremely short, and nights very very long. At that time my husband worked and was a full time student and although I wanted to beg him to stay up late with me so I would have someone to talk to, I thought it best that at least one of us get some sleep, especially if he was the one providing for our family.
 So there I was, alone, night after night holding a very unhappy baby. I would just get him to sleep and feel like if I moved an inch, he would wake up and scream again. Many nights I tried to sleep with him in my arms, sitting up on the couch.... waking up in a panic thinking he was going to roll off my lap. I found after a little while that he slept better with the soft sound of the TV on in the background. This was more entertaining for me, so it worked in my favor... or so I thought. I found myself wasting my brain away to pointless and silly reality TV shows and poor actresses getting paid to show off their dramatic lifestyle. "you want to see drama? Come to my house and see what I go through every night! Ill give you some drama..." I thought to myself.
 
All the brain draining TV was doing me no good. Finally I found The Food Network channel. I thought at least I would be learning something if I had to stay up late anyway. I started watching Giada De laurentiis, Guy Fieri, Paula Deen, Rachel Ray and The Barefoot Contessa ... Soon I was hooked and I was learning different skills from all of them. I learned that liver is best prepared by pre soaking it in milk, and room temperature ingredients make for a much better baked dessert because the ingredients are more easily incorporated at room temp. I started watching chopped and learned about people who had struggled through drug and crime addictions, depression or loosing a loved one and finding joy and success through cooking. Cooking had pulled them out of a dark place, and helped them become motivated again.
THIS WAS EXACTLY WHAT I NEEDED. I starting doing a little more cooking and experimenting during the day, and trying new recipes (with baby in one arm of course). I even learned to make scrambled eggs while holding the baby, finding a way to crack the eggs, and add them to the pan one handed. I found that it rebuilt my self confidence in a new way. Cooking helped me though my post partum depression and made me feel like myself again. I wanted to have family dinners around the table, and if that was the only thing I could accomplish that day, well then it was ok because I did something great for my family.
I am so thankful for cooking and being able to enjoy spending time in my kitchen. Since all of this started in 2009 there have most certainly been many other trials that cooking has helped me though. It has become a passion and obsession. It makes me happy and brings me and my family so much joy. It helps me feel confident and secure because I know how to be self reliant by cooking and being able to store things away in my freezer for a rainy day.
So, on gray November days like this one when I feel the blues start sneaking back, I find some time to create something... a recipe that brings me happiness and makes me feel like myself again. A reminder that I can get though hard times and create my own happiness.
Todays recipe is another product of experimentation, and frankly cleaning out the fridge and panty. Sometimes I don't have everything I need to make a recipe, so I challenge myself by making up something new. Do they turn out bad? Sometimes yes! And then once in a while I get lucky a recipe will be really good. Here is what I made today from a few fridge, pantry and left over garden ingredients.
 
Roasted and stuffed Acorn Squash
This healthy recipe comes in handy if you are cleaning out your fridge or pantry because you can swap out something I did for something you have at home. The tasty hash stuffing is full of garlic and chicken flavor, with a crunch from the walnuts and a tiny bite of sweet from the craisins.
 
This dish serves 2 adults or can be cut in half or quarters and served to children. The hash can be doubled or tripled for larger quantities.
First, take an acorn squash and slice it down the middle. Gut the seeds and add them to a baking dish. Preheat your oven to 400 degrees. Let them bake about 40 minutes or until fork tested tender.


Next, chop half a yellow onion and add in an 8 oz container of mini bella mushrooms (or whatever you have on hand). I chose to use mushrooms as a healthy alternative to meat. These are very hearty mushrooms and they are like mini sponges that soak up all surrounding flavors.
 I also added 1 clove chopped garlic, 1/2 teaspoon salt and 1/4 teaspoon garlic powder and a dash of pepper.
Let them sauté in oil or butter until tender.

 
Prepare 1 box of chicken flavored rice a roni. This will add texture, flavor and creaminess to the stuffing. FOR A GLUTEN FREE OPTION ADD QUINOA PREPARED IN CHICKEN STOCK.


Once the rice is done cooking, remove about 1/3 of it and store it in the fridge for later. Add your mushroom and onion mixture to the rice. Add 1/2 cup of chopped walnuts, 1/2 teaspoon chopped fresh parsley, and a small handful of craisins.


After your  squash is cooked through, remove them from the oven and add the filling. Fill them over the top.
 

I chose to add some of this fabulous cheese I had on hand. It is a cheddar onion cheese that has incredible flavor. I added it on top of my squash, but for more flavor you could add a slice half way through the filling as well.


Then I added them back inside the oven on Vari broil Lo to melt the cheese for a few minutes.
I love the roasted look of the squash but if you want to add them back into a warm oven to melt the cheese and avoid the dark spots that is great too!
 
<


Not only did this sweet little recipe help clean out my fridge and pantry, but it added a little color to my gray November day. I hope you enjoy it!
 
post signature


Blogging tips