For part two of this wreath making series, I will demonstrate how to make a two toned burlap wreath. I made this wreath in both a large and small size. I will show you a few pictures from both.
If you missed part 1 of this post, go HERE

Supplies needed:
1. A foam wreath from Walmart or the Dollar store.
2. 2 yards or a large roll of regular burlap + 2 yards of a lighter color of burlap or roll of lighter colored burlap.
3. Hot glue gun and glue sticks for days :)
4. Embellishment's of your choice such as, leaves, raffia, fall flowers, fake gourds or pumpkin's, Christmas ribbons or poinsettia's.
Through trial and error, and cutting out A LOT of 5"X5" burlap squares, I discovered that it may be quicker and easier to buy the burlap on a spool. Check your local craft store for this. You should be able to find it and just cut 5" cuts in length down the ribbon. If you are unable to find the lighter tone in burlap, try getting a thinner burlap, so when you add it next to the thick burlap squares, it will create a new and pretty texture.
To start, make sure and wrap the full wreath with burlap so if there are any bald spots, you wont be able to see the foam through them. ALSO, hot glue does not stick to foam, it just melts it. You will need the burlap base to help glue the squares on.
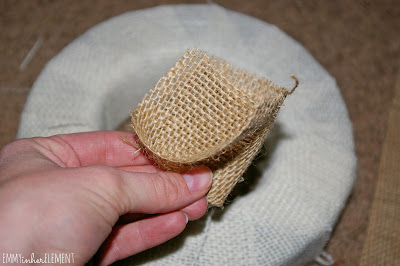
Now take a 5x5 inch square, and fold it in half.
Put a little hot glue down the center, and fold it in half again.
THIS NEXT STEP WILL SAVE YOU LOTS AND LOTS OF HOT GLUE BURNS ON YOUR FINGERS!
I discovered that if you take an extra piece of burlap, and set it over the top of the burlap square that you just glued on, this will save you from getting a glue burn (a popsicle stick works great too). The burlap has a lot of holes where the glue can come through. Hold the extra burlap over the glued piece for about 30 seconds. If you take the pressure off too soon, the square will open back up or fall off. Make sure to keep it on there long enough that it will be securely in place. Now remove your extra piece, and continue to do this all over the wreath until it is filled in and fluffy. There is no rhythm or rhyme about gluing the different colors, just try to spread them out evenly.
As you can see, I wanted to see what the embellishment would look like before I finished the wreath.(I'm impatient like that.) I added some raffia, fall flowers and faux leaves from the dollar store. I think they look so pretty and there are so many different things you could add. I like to place my embellishments about 4 o'clock on the wreath.
Here are a few pictures from the larger one I made.
I think the red poinsettia looks so pretty against the neutral colors of the burlap.
I hope you enjoyed this tutorial, and I would be soo happy to see what you come up with in your crafting. Feel free to email me or ask any questions, and if you feel like you want to share your wreath, please post a picture on my Facebook page!
xoxoxo


No comments:
Post a Comment