 By now you know by now how much I love apple pie. I have shared many versions... salted caramel apple pie, sweet cinnamon apple pie turnovers, mini apple pies, 2 tips to change the look of your pie crust and my most recent (and possibly favorite) post on homemade apple blossoms.
Today I am going to break away a little from a full on apple pie, and switch over to something a little more simple, but still beautiful none the less. We can be fancy and call this a "French apple galette", galette meaning "free form" aka no stress over fitting the dough just perfect or making pretty edges, or we can be real and call it what it is. A simple no fuss, elegant to the eye and delicious to the taste dessert. It's easy, fun and when the scent of buttery crust and warm sweetened apples hits your senses you will find yourself wandering around your kitchen aimlessly until the timer beeps FINISHED!
I hope you enjoy this recipe as much as I have. I found myself twirling in my apron dreaming of a fall day when I have a basket of freshly picked apples from a neighbor and warm quilt to wrap up in... ah fall, how I love you.
By now you know by now how much I love apple pie. I have shared many versions... salted caramel apple pie, sweet cinnamon apple pie turnovers, mini apple pies, 2 tips to change the look of your pie crust and my most recent (and possibly favorite) post on homemade apple blossoms.
Today I am going to break away a little from a full on apple pie, and switch over to something a little more simple, but still beautiful none the less. We can be fancy and call this a "French apple galette", galette meaning "free form" aka no stress over fitting the dough just perfect or making pretty edges, or we can be real and call it what it is. A simple no fuss, elegant to the eye and delicious to the taste dessert. It's easy, fun and when the scent of buttery crust and warm sweetened apples hits your senses you will find yourself wandering around your kitchen aimlessly until the timer beeps FINISHED!
I hope you enjoy this recipe as much as I have. I found myself twirling in my apron dreaming of a fall day when I have a basket of freshly picked apples from a neighbor and warm quilt to wrap up in... ah fall, how I love you.
Recipe for French Apple Galette
Slightly adapted recipe from here
Dough ingredients:
1 cup all-purpose flour
1/2 teaspoon sugar
1/8 teaspoon salt
6 tablespoons butter cubed into small pieces
3 1/2 tablespoons chilled water
Filling:
2 pounds about 8 apples (Granny smith, pink lady or any tart firm apple) peeled, cored (save peels and cores), and sliced
2 tablespoons butter melted
3-4 tablespoons sugar
Glaze:
1/2 cup sugar
1 tablespoon lemon juice
peels and cores of apples
cornstarch (optional)
Mix flour, sugar, and salt in a large bowl; add 2 tablespoons of the cold cubed butter. Blend in a mixer or food processer until dough is chunky and butter resembles large peas.
Slowly add in water, stir or pulse and then add remaining cubes of butter until dough just holds together.
Remove dough from food processer and flatten into a 4-inch-thick disk; refrigerate. After at least 15 minutes. On a lightly floured surface, roll into a 14-inch circle about 1/8 inch thick. Flour your rolling pin as well to resist sticking.
Place your dough in a lightly greased 9-inch round tart pan, OR if you are going free form, roll dough up on your rolling pin, and unroll on to your baking sheet covered in parchment paper. Heat oven to 400 F.
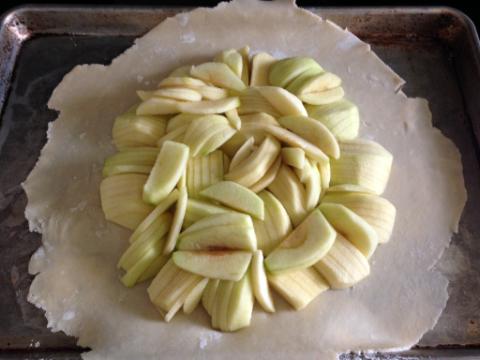
Slice apples thin and neatly arrange on your dough in a ring 2 inches from edge if going galette-style, or up to the sides if using the tart pan or pie dish. Continue inward until you reach the center. Fold any dough hanging over pan back onto itself; crimp edges at 1-inch intervals.
Brush your melted butter over apples and onto dough edge. Sprinkle 1 1/2 tablespoons sugar over dough edge and 2 tablespoons over apples.
Bake in center of oven until apples are soft, with browned edges, and crust has caramelized to a dark golden brown, 40-45 minutes.
To make glaze: Put reserved peels and cores in a large saucepan, along with sugar and lemon juice. Pour in just enough water to cover; simmer for 25 minutes. Strain syrup and add back to pan. Use cornstarch to thicken if desired. (One recipe of glaze made a jar extra that I kept in my fridge for up to 1 week to use on other tarts.
When tart is finished baking, remove from oven, and slide off parchment onto cooling rack. Let cool at least 15-20 minutes.
Brush the glaze over tart, slice, and serve.
If you do not have a pie dish or a tart pan, go ahead and place dough on parchment paper on a baking sheet and build the apple tart galette style (free form), see pics below.
Free form option:


share this post »