Tuesday, August 12, 2014

French Apple Galette AKA easy free form apple tart


 By now you know by now how much I love apple pie.  I have shared many versions... salted caramel apple pie, sweet cinnamon apple pie turnovers, mini apple pies, 2 tips to change the look of your pie crust and my most recent (and possibly favorite) post on homemade apple blossoms.
Today I am going to break away a little from a full on apple pie, and switch over to something a little more simple, but still beautiful none the less. We can be fancy and call this a "French apple galette", galette meaning "free form" aka no stress over fitting the dough just perfect or making pretty edges, or we can be real and call it what it is. A simple no fuss, elegant to the eye and delicious to the taste dessert. It's easy, fun and when the scent of buttery crust and warm sweetened apples hits your senses you will find yourself wandering around your kitchen aimlessly until the timer beeps FINISHED!
I hope you enjoy this recipe as much as I have. I found myself twirling in my apron dreaming of a fall day when I have a basket of freshly picked apples from a neighbor and warm quilt to wrap up in... ah fall, how I love you.  
 
Recipe for French Apple Galette
Slightly adapted recipe from here
 
Dough ingredients:
1 cup all-purpose flour
1/2 teaspoon  sugar
1/8 teaspoon salt
6 tablespoons butter cubed into small pieces
3 1/2 tablespoons chilled water
 
 Filling:
2 pounds about 8  apples (Granny smith, pink lady or any tart firm apple) peeled, cored (save peels and cores), and sliced
2 tablespoons butter  melted
 3-4 tablespoons sugar
 
Glaze:
1/2 cup sugar
1 tablespoon lemon juice
peels and cores of apples
cornstarch (optional)
 
Mix flour, sugar, and salt in a large bowl; add 2 tablespoons of the cold cubed butter. Blend in a mixer or food processer until dough is chunky and butter resembles large peas.
Slowly add  in water, stir or pulse and then add remaining cubes of butter until dough just holds together. 
 Remove dough from food processer and flatten into a 4-inch-thick disk; refrigerate. After at least 15 minutes.  On a lightly floured surface, roll into a 14-inch circle about 1/8 inch thick. Flour your rolling pin as well to resist sticking. 
Place your dough in a lightly greased 9-inch round tart pan, OR if you are going free form, roll dough up on your rolling pin, and unroll on to your baking sheet covered in parchment paper. Heat oven to 400 F. 
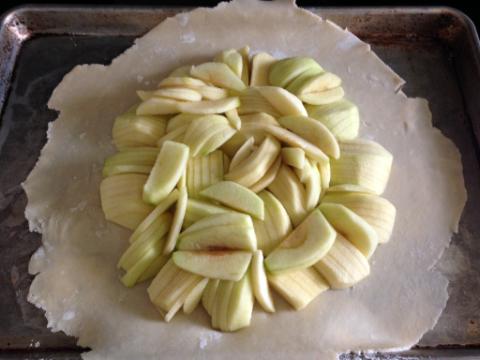
Slice apples thin and neatly arrange on your dough in a ring 2 inches from edge if going galette-style, or up to the sides if using the tart pan or pie dish. Continue inward until you reach the center. Fold any dough hanging over pan back onto itself; crimp edges at 1-inch intervals.
Brush your melted butter over apples and onto dough edge. Sprinkle 1 1/2 tablespoons sugar over dough edge and 2 tablespoons over apples.
Bake in center of oven until apples are soft, with browned edges, and crust has caramelized to a dark golden brown, 40-45 minutes.


To make glaze: Put reserved peels and cores in a large saucepan, along with sugar and lemon juice. Pour in just enough water to cover; simmer for 25 minutes. Strain syrup and add back to pan. Use cornstarch to thicken if desired. (One recipe of glaze made a jar extra that I kept in my fridge for up to 1 week to use on other tarts.
When tart is finished baking, remove from oven, and slide off parchment onto cooling rack. Let cool at least 15-20 minutes.
Brush the glaze over tart, slice, and serve.


If you do not have a pie dish or a tart pan, go ahead and place dough on parchment paper on a baking sheet and build the apple tart galette style (free form), see pics below.


Free form option:


post signature

Friday, August 1, 2014

Homemade {no boil} cinnamon and sugar bagels


I LOVE bagels. One of my favorite flavors is cinnamon and sugar with strawberry cream cheese. I have tried several recipes for bagels and to be honest, I have found that going and buying one from the bagel shop is much easier than mixing, boiling and baking them at home. It can be a big process.
 
I have really wanted to be able to make bagels at home to use for breakfasts throughout the week, so I have modified this recipe to be boil free and simplified. That saves money from buying them at the store, and you can freeze these if you don't use them all in one shot. I hope you like it! Every time I make these my little brother shows up at my home to steal them... This recipe makes 8 bagels so if you need more than that, make sure to double it or make two back to back batches.
Happy bagel making!
 

Wednesday, July 16, 2014

Homemade {ALL NATURAL} Lavender Bath Fizzies for relaxation

 Have you ever tried using a bath bomb/fizzy to help you relax in the tub?
Did you know buying them at a body shop can cost you almost $7 just for one?
 
 
 I am a big fan of taking "Mommy time" and because I don't get very much time to myself, when I do, it usually means a bath. Its quiet, relaxing and FREE (in more ways than one).  Sounds like my kinda time alone.
 
I did a little research and found a few recipes for these bath fizzies. Turned out they are pretty darn easy to make at home, not to mention cheap compared to those shown above! I made a few batches of these for Mother's day, as well as some to hand out to my son's teacher and his soccer coaches. For a teacher or coach gift, just add a little tag that says "you're the bomb! Thanks for...."
These fizzies are so fun you simply drop them into a warm bath, and watch them fizzle and slowly dissolve until you can smell the heavenly scents of your oils and feel them soften and moisturize your skin! If you are not a bath taker, these can work on the shower floor as well. You would benefit from the scents but obviously not from the skin moisturizers, and they don't last as long.
 

Tuesday, July 8, 2014

Super Giant Bubbles- a super fun summer activity!

 
Last night I went to a family reunion. I knew it would mostly be adults visiting so I thought it would be fun to take an activity for the older kids to do outside. As it turns out, these giant bubbles are so fun for all ages. They are so awesome and seriously enormous! 

Wednesday, July 2, 2014

Homemade Bath Fizzies {perfect for congestion and sore throats}


Have you ever lived with a Man who has a cold? If not, let's just go ahead and say it like it is... giving birth is easier.
 

Wednesday, June 18, 2014

Chewy and puffy GLUTEN FREE chocolate chip cookies.


If you have ever tried going gluten free, you know that without gluten in baked goods, they can turn out grainy and dry with an odd texture. Gluten provides chewiness in breads and goodies so its tough to find a gluten free recipe that compares.
 My Mom was diagnosed with celiac disease 3 years ago (her guest post here) and since then she has put in a lot of hard work and study to find recipes that are as close to the real thing (with gluten) as possible. She drove over to my house late last night to share a few of these warm and chewy chocolate chip cookies with me.
As I sat in her dark car and took a bite of this new experiment, she waited anxiously to hear what I thought of them. To my great surprise, these little delights are chewy, puffy, moist and full of great texture and flavor. These are not words that you would normally use in the same breath as a gluten free cookie. If you or someone you know is going gluten free or has celiac disease, you have got to make them a plate of these cookies. I guarantee you will get a big hug because they probably haven't had a treat like this is a while!!

Wednesday, June 11, 2014

Homemade Apple Blossoms and my favorite pie dough recipe

 
I am so excited to share this "sculptural" recipe with you. It is a product of pure experimentation in the kitchen, mixing my passions for baking and artistry. I thought it would be so fun to make something a little different than the traditional turnovers, although we love those too as you can see HERE.
 
These apple blossoms are so fun to make for a family breakfast or a delicious dessert. This is also a great recipe to make with your kids! If the apple blooms "blossom" open in the oven, no worries that is part of what makes them fun!
 

Saturday, June 7, 2014

Strawberry-Orange Yogurt Muffins


Strawberries were on sale at Costco this week and I couldn't help myself... even though I knew deep down I wouldn't be able to eat the entire package before they expired, I bought them anyway. I figured it would force me to get a little creative and use them, instead of tossing what we couldn't finish. Sure enough, I stumbled upon this delicious recipe over at Baked Perfection for strawberry muffins. I really liked the recipe the first time I made it, but I had an idea that I thought would put it over the top... adding the orange. Did you know that strawberry and orange together make magic? Well its true... and this recipe proves it.
 
Recipe: Strawberry-orange yogurt muffins
Recipe from Emmy in her Element Adapted from Baked Perfection
Makes 12 muffins
 
2 eggs
2/3 cup white sugar
1/2 cup vegetable oil
1 teaspoon vanilla extract
2 cups all-purpose flour
1/2 teaspoon salt
1/2 teaspoon baking soda
1 teaspoon cinnamon
1/2 cups vanilla Greek yogurt
1/8 cup fresh orange juice
1 1/2 teaspoons orange zest
1 1/2 cups diced strawberries

 Heat oven to 400 degrees F. Pre grease muffin tin with pam or use muffin liners.
 
In a medium bowl mix together, eggs, sugar vegetable oil. yogurt, orange juice, vanilla, and zest.
Combine flour, soda, salt and cinnamon and add slowly to wet ingredients mixing just until incorporated. Fold in strawberries. Scoop into muffin tins until filled and bake for 18-20 minutes or until muffins have popped up and are golden brown on top. Let cool and serve within 24 hours or freeze in a ziplock when cooled to room temperature.


Be sure to enjoy these muffins within 24 hours as the strawberries soften significantly after baking. These work great to make ahead and freeze if you don't need them until later!

 
post signature

Friday, May 30, 2014

How to frost a beautiful cake with a butter knife and tin foil


Ready to ditch the piping bags, fancy cake frosting equipment and sprinkles? Today I'm going to show you a quick and easy way to frost a simple but beautiful cake with just a butter knife and some tin foil. You can use wax paper too. In no time flat you will have a dessert that looks as pretty as it tastes!
 
My first tip for frosting a perfect cake, is to make your cake ahead and freeze it. The cake will stay fresh in the freezer, and when you are ready to frost it, just pull it out and you're all ready to go. Freezing the cake makes it super easy to frost without getting those little cake crumbs smeared all around in the pretty frosting. If you don't have time to freeze ahead, you can still use this process you will just have to be a little more careful as you frost not to dig up the cake.
 
Next step, use a little tin foil or wax paper and rip off four pieces. I liked using tin foil because I folded it down over the edges so it would stay put. You want to keep it close to the edges because we are going to pull these off after we frost our cake.


Next, place your first layer of cake on the pan. Plop the frosting in the top center and spread it around the top of the cake leaving 1/2 inch border. This will leave a little space for when you top the cake with the next layer and the frosting "squishes" a little.


The next important tip for cake frosting is to make sure and frost from the TOP down. That means you only want to add more frosting to the very top of the cake, and use your knife to spread it down to the bottom in small circular motions.

 
Now that the cake is fully covered, we are going to make small circular motions all over the cake to fancy it up a bit. Just use your butter knife. It doesn't have any rhyme or reason, just random circles to make a beautiful cake.

 
Slowly and carefully pull/shake your tin pieces out from under the cake.

 
I topped mine with fresh raspberries for a pop of color and simplicity. Cherry's would be gorgeous too for a more vintage look.


Now go impress your guests with your no mess cake!
 
 
post signature

Wednesday, May 28, 2014

Bedroom Decorating tricks {on a dime!}

Today I wanted to share photos from the master bedroom of my small home. I have been hesitant to share pictures of my humble home because well, it's not exactly as beautiful and perfect as some of the other home tours you will find on Pinterest. But, with a lot of work, thrifting and hand made items, I have been able to transform my space into a comfortable and cozy haven with a touch of farmhouse charm. I have had to do it all on a dime, so I will share with you where I purchased a lot of my décor and furniture pieces.
 
Living in an older home comes with good and bad all in one.
 
The pros in this space?
1. Gorgeous wood floors. {ahhhh}
2. Large windows that let the sunshine light up my room in the afternoon through the evening. -Wonderful-
 
The cons?
1. Very small room, my King Size bed takes up most all of the space.
2. Hardly any closet space. A his and hers closet measuring only 3 feet in width. You know what this means right...? Both sides are mine :)
 
Here are a few tricks for making the most of the small space...
 
-Adding mirrors to a room gives it fluidity and makes it feel bigger because rather then seeing just wall space, your eyes see into the reflection making the space seem larger.
 
-Using light colors vs. dark paint and bedding can always add visual space to a room. The darker the paint on the walls, the more closed in and smaller it will become visually. I chose taupe's and whites for this room to help it feel more open and airy, although now that the gray trend is in, I would love to paint this room a very light gray color. Seems like there is always something to change isn't there?
 

Honestly, these hydrangeas were the most expensive decor item in the room. I have collected these for months when they go on sale at Joanne's Fabric. I love how they all look together in the basket. The handkerchief was a gift to me from a family member. I love its hand stitched tatting and intricate detail. I knew I would display it instead of using it for its true purpose... boogies! haha 


The lamp was a DI find, one small chip on the back of it that no one will ever see. I was so excited to find it for $2. The shade is from a Shopko clearance rack.
 
I use a pretty white dish I thrifted to display my jewelry and keep it in an easily accessible place. I let the pearls drape over the bowl to add a little bit of glam. Beneath it is a pretty doily I picked up at a garage sale.

 
This lovely dresser is a garage sale find. A woman was selling all of her Grandmother's furniture. I would have bought the whole lot if I had the money... it was all so beautiful. She had trunks and chairs and this beautiful vanity with a mirror that was so pretty. I left with this dresser, talking her down to only $35 because she needed to sell all her items. I was ecstatic. I painted it a creamy white, and left the top alone. I like the contrast and the distressed look it has. I love the original hardware and dovetail drawers.
 
The hassock is also a garage sale find. Underneath the cute polka dot fabric that I covered it with is a funky yellow vinyl. While I thought it looked pretty cool as was, I knew it wouldn't match my room so I took this pretty fabric and hot glued it around the bottom... cause who is going to tell a difference between that and a sewed cover? :)
 
 
This book page wreath adds texture and art to my room. I love it nestled right at the top of my old barn wood ladder. Do you want to make your own? They are so cheap and easy... find the TUTORIAL here.


I also use the ladder to display an old crocheted quilt if found over at Vintage Farm Furniture. I love it's beautiful scalloped edges. This adds a coziness to the room and also a fun texture.


This old gal was a hot deal I scored at a moving sale. It was  $40 and lime green. Yep, the ugliest green you can imagine. I'm sure it looked cute in a child's room or something, but it wasn't going to last in my home that color. I saw its shape, hardware and legs and had to take it. I saw its potential. I started out painting it a creamy white (Ivory Palace from BEHR paint + primer) and painted the bottom. I wanted to sand down the top and stain it a walnut to match my other dresser in the room. As I started to sand it, the original owner's white primer showed through as the green faded away. I stopped and stepped back, admiring the distressed and uneven look of the sanded top. I couldn't do any more, I had never seen a unique look like this and I fell in love with it. Maybe it doesn't suit all tastes but I wouldn't change it now.
I ended up using a little stain to antique the drawers on the front. For now, it looks just how I like it.
 
A family member found me the old well bucket at an antique flea market sale. It's an old original bucket and a real treasure to me. You could use it for so many things, for now, its purpose is to hold all of my magazines that I have yet made time to drool over :)

 
These pillows are from TJ MAXX I just love the birds. The fun thing about decorating in neutrals is that you can always swap out accessories (pillows blankets flowers curtains or lamps) for different colors each season or Holiday.
 If you tend to change things around a lot (LIKE ME!) then stick to neutrals and change the pillows. You will be surprised at how much throw pillows and quilts can change the look of a room.


Bedding, TJ MAXX (all separate pieces found over time), all curtains found at ROSS stores.


UPDATE! Want to see my latest bedroom décor and my new DIY headboard? Click Here
 
post signature
 
Blogging tips